Intro
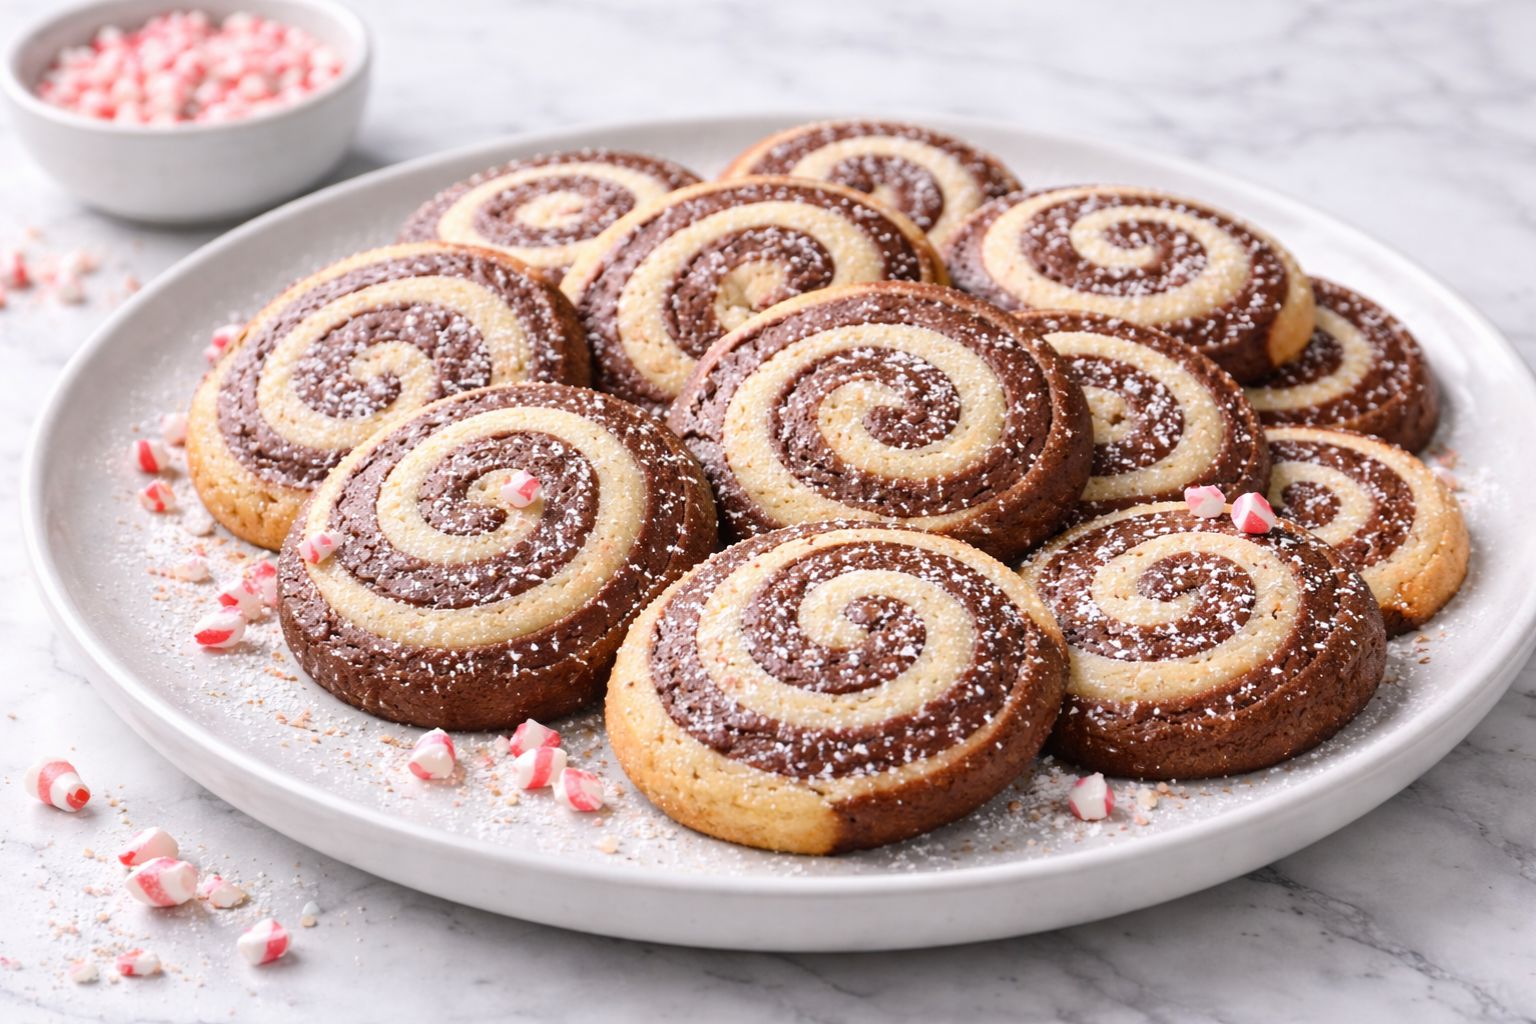
There is something magical about the combination of chocolate and peppermint, especially during the holiday season. Peppermint Chocolate Swirl Cookies are the kind of treat that instantly feels festive, comforting, and a little bit special.
The first time I baked these, the aroma of cocoa and cool peppermint filled my kitchen, and I knew they would become a seasonal favorite.
As a baker who loves creating visually beautiful desserts that taste just as good as they look, these cookies are pure joy to make. The dramatic chocolate and vanilla peppermint swirls create a stunning pattern, while the flavor delivers that perfect balance of rich cocoa and refreshing mint.
They are soft in the center, slightly crisp at the edges, and absolutely irresistible with a cup of coffee or hot chocolate.
If you are looking for a cookie recipe that feels impressive but is surprisingly simple to prepare, you are going to love this one.
What Are Peppermint Chocolate Swirl Cookies?
Peppermint Chocolate Swirl Cookies are buttery sugar cookies divided into two doughs — one flavored with cocoa and the other infused with peppermint extract. The two doughs are rolled together to create a beautiful swirl pattern before baking.
The result is a cookie that is not only eye-catching but also layered in flavor. The chocolate portion adds deep richness, while the peppermint dough brings a cool, refreshing contrast. Together, they create a festive dessert that is perfect for holiday platters, cookie exchanges, or gifting.
Equipment List
You do not need anything complicated to make these cookies, but a few tools will make the process easier.
- Mixing bowls
- Hand mixer or stand mixer
- Measuring cups and spoons
- Rubber spatula
- Plastic wrap
- Rolling pin
- Baking sheet
- Parchment paper
- Cooling rack
Recipe Card Info
Prep Time: 25 minutes
Chill Time: 1 hour
Bake Time: 10 minutes
Total Time: About 1 hour 45 minutes
Servings: 24 cookies
Cuisine: American
Course: Dessert
Calories: Approximately 160 per cookie
Ingredients
For the base dough:
- 1 cup unsalted butter, softened
- 1 cup granulated sugar
- 1 large egg
- 1 teaspoon vanilla extract
- 2 ½ cups all-purpose flour
- ½ teaspoon baking powder
- ¼ teaspoon salt
For the chocolate portion:
- ¼ cup unsweetened cocoa powder
- 1 tablespoon milk (if needed for texture)
For the peppermint portion:
- ½ teaspoon peppermint extract
- Optional: 1–2 drops red food coloring for a festive swirl
Optional topping:
- Crushed peppermint candies
- Melted dark or white chocolate for drizzle
Instructions (Step by Step)
Step 1: Make the Base Dough
In a large mixing bowl, cream together the softened butter and sugar until light and fluffy. Add the egg and vanilla extract, mixing until fully combined.
In a separate bowl, whisk together flour, baking powder, and salt. Gradually add the dry ingredients to the wet mixture, mixing until a soft dough forms.
Step 2: Divide and Flavor the Dough
Divide the dough evenly into two portions. To one portion, mix in cocoa powder until fully incorporated. If the dough feels slightly dry, add a tablespoon of milk.
To the second portion, mix in peppermint extract and optional red food coloring.
Step 3: Chill the Dough
Wrap both dough portions in plastic wrap and refrigerate for at least 1 hour. Chilling makes rolling and shaping much easier.
Step 4: Roll and Create the Swirl
Roll out each dough portion into a rectangle of similar size on lightly floured parchment paper. Carefully place one layer on top of the other.
Gently press together and roll the stacked dough into a tight log, starting from the longer edge to create a swirl pattern.
Wrap the log and chill for another 20–30 minutes to firm up.
Step 5: Slice and Bake
Preheat oven to 350°F (175°C). Line a baking sheet with parchment paper.
Slice the chilled dough log into ½-inch rounds and place on the baking sheet, spacing slightly apart.
Bake for 10–12 minutes, or until edges are set but centers remain soft. Do not overbake.
Step 6: Cool and Decorate
Allow cookies to cool on the baking sheet for 5 minutes before transferring to a cooling rack.
If desired, drizzle with melted chocolate or sprinkle with crushed peppermint candies while still slightly warm.
Why I Love This Recipe
These cookies bring together beauty and flavor in such a simple way. I love how the swirl pattern looks intricate, yet the process is surprisingly easy once you try it. The peppermint is refreshing without overpowering the chocolate, and the buttery base keeps everything balanced.
They are perfect for holiday gatherings because they stand out on a dessert table and feel thoughtfully homemade.
Flavor Profile and Texture
Peppermint Chocolate Swirl Cookies are soft and tender with slightly crisp edges. The chocolate layer offers deep cocoa richness, while the peppermint layer adds a cool, bright finish.
When enjoyed fresh, the texture is soft and melt-in-your-mouth. After a day, they develop a slightly firmer bite while remaining delicious.
Tips for Perfect Swirl Cookies
Chill Thoroughly
Cold dough holds its shape and creates cleaner swirl patterns.
Roll Evenly
Keep both dough layers the same thickness to ensure balanced flavor in every bite.
Avoid Overbaking
Remove cookies when centers still look slightly soft. They will continue to set as they cool.
Variations You Can Try
Add Chocolate Chips
Mini chocolate chips in the peppermint dough add texture and extra richness.
White Chocolate Swirl
Replace cocoa with melted white chocolate in one layer for a creamier twist.
Dip Half in Chocolate
After baking, dip half of each cookie in melted dark chocolate for a bakery-style finish.
Make-Ahead and Storage
The dough can be prepared and refrigerated up to 48 hours in advance. You can also freeze the dough log for up to 2 months and slice as needed.
Baked cookies store well in an airtight container at room temperature for up to 5 days.
Common Mistakes to Avoid
- Skipping the chilling step
- Rolling uneven layers
- Overworking the dough
- Overbaking the cookies
Taking your time with shaping makes all the difference in the final presentation.
Frequently Asked Questions
Can I make these without food coloring?
Absolutely. The swirl will still look beautiful with just chocolate and vanilla peppermint dough.
Can I use peppermint candy instead of extract?
Peppermint extract provides consistent flavor, but finely crushed candy can be mixed in for texture.
Are these good for gifting?
Yes. Their striking swirl pattern makes them perfect for cookie boxes and holiday tins.
Final Thoughts
Peppermint Chocolate Swirl Cookies are the kind of treat that brings both comfort and celebration into your kitchen. They are visually stunning, easy to customize, and full of that classic chocolate-mint flavor combination that never goes out of style.
Every time I bake a batch, I am reminded that sometimes the simplest ingredients — butter, sugar, cocoa, and peppermint — can create something truly special. These cookies are more than just dessert. They are a little swirl of holiday happiness in every bite.
Peppermint Chocolate Swirl Cookies Recipe
Equipment
- Mixing bowls
- Hand mixer or stand mixer
- Measuring cups and spoons.
- Rubber spatula
- Plastic wrap
- Rolling Pin
- Baking sheet
- Parchment paper
- Cooling rack
Ingredients
For the base dough:
- 1 cup unsalted butter softened
- 1 cup granulated sugar
- 1 large egg
- 1 teaspoon vanilla extract
- 2 ½ cups all-purpose flour
- ½ teaspoon baking powder
- ¼ teaspoon salt
For the chocolate portion:
- ¼ cup unsweetened cocoa powder
- 1 tablespoon milk if needed for texture
For the peppermint portion:
- ½ teaspoon peppermint extract
- Optional: 1–2 drops red food coloring for a festive swirl
Optional topping:
- Crushed peppermint candies
- Melted dark or white chocolate for drizzle
Instructions
Step 1: Make the Base Dough
- In a large mixing bowl, cream together the softened butter and sugar until light and fluffy. Add the egg and vanilla extract, mixing until fully combined.
- In a separate bowl, whisk together flour, baking powder, and salt. Gradually add the dry ingredients to the wet mixture, mixing until a soft dough forms.
Step 2: Divide and Flavor the Dough
- Divide the dough evenly into two portions. To one portion, mix in cocoa powder until fully incorporated. If the dough feels slightly dry, add a tablespoon of milk.
- To the second portion, mix in peppermint extract and optional red food coloring.
Step 3: Chill the Dough
- Wrap both dough portions in plastic wrap and refrigerate for at least 1 hour. Chilling makes rolling and shaping much easier.
Step 4: Roll and Create the Swirl
- Roll out each dough portion into a rectangle of similar size on lightly floured parchment paper. Carefully place one layer on top of the other.
- Gently press together and roll the stacked dough into a tight log, starting from the longer edge to create a swirl pattern.
- Wrap the log and chill for another 20–30 minutes to firm up.
Step 5: Slice and Bake
- Preheat oven to 350°F (175°C). Line a baking sheet with parchment paper.
- Slice the chilled dough log into ½-inch rounds and place on the baking sheet, spacing slightly apart.
- Bake for 10–12 minutes, or until edges are set but centers remain soft. Do not overbake.
Step 6: Cool and Decorate
- Allow cookies to cool on the baking sheet for 5 minutes before transferring to a cooling rack.
- If desired, drizzle with melted chocolate or sprinkle with crushed peppermint candies while still slightly warm.

Hi, I’m Olivia Brooks! Cooking is my passion, and I love turning everyday ingredients into meals that bring joy to the table. On CulinaryPearl, I share simple recipes, helpful kitchen tips, and inspiration for food lovers everywhere