Intro
If you share your home with a dog, you probably know that special moment when they hear something delicious happening in the kitchen. The little footsteps, the curious nose, the hopeful eyes—it melts my heart every single time. As a chef and a dog mom, I love cooking for my family, and that absolutely includes my furry companion.
That is exactly how this Bacon & Cheese Dog Biscuits Recipe was born. One afternoon while I was cooking breakfast, the smell of bacon filled the kitchen and my dog was sitting patiently beside me like the most polite food critic in the world.
I started wondering: why not make homemade treats that are just as exciting for dogs as they are simple for us to prepare?
Homemade dog treats are surprisingly easy, and they allow you to control every ingredient that goes into your pet’s snacks. This recipe combines crispy bacon, savory cheese, and wholesome flour into crunchy biscuits that dogs absolutely love.
The Bacon & Cheese Dog Biscuits Recipe is not only fun to make, but it also fills the kitchen with an amazing aroma. While the biscuits bake, the scent of bacon and cheese drifts through the house, and trust me—your dog will be waiting by the oven.
These biscuits are crunchy, flavorful, and perfect as a training reward or a small everyday treat. They are made with simple pantry ingredients and require very little prep time.
In this guide, I’ll walk you through everything you need to know to make the perfect Bacon & Cheese Dog Biscuits Recipe at home—from ingredients and equipment to step-by-step instructions and helpful tips.
Let’s start with the basics.
What is Bacon & Cheese Dog Biscuits Recipe?
Bacon and cheese dog biscuits are homemade crunchy treats designed specifically for dogs. They are baked biscuits made with dog-safe ingredients like whole wheat flour, eggs, cheese, and small amounts of bacon for flavor.
Unlike store-bought dog treats that often contain preservatives and additives, homemade dog biscuits are simple and transparent. You know exactly what goes into them.
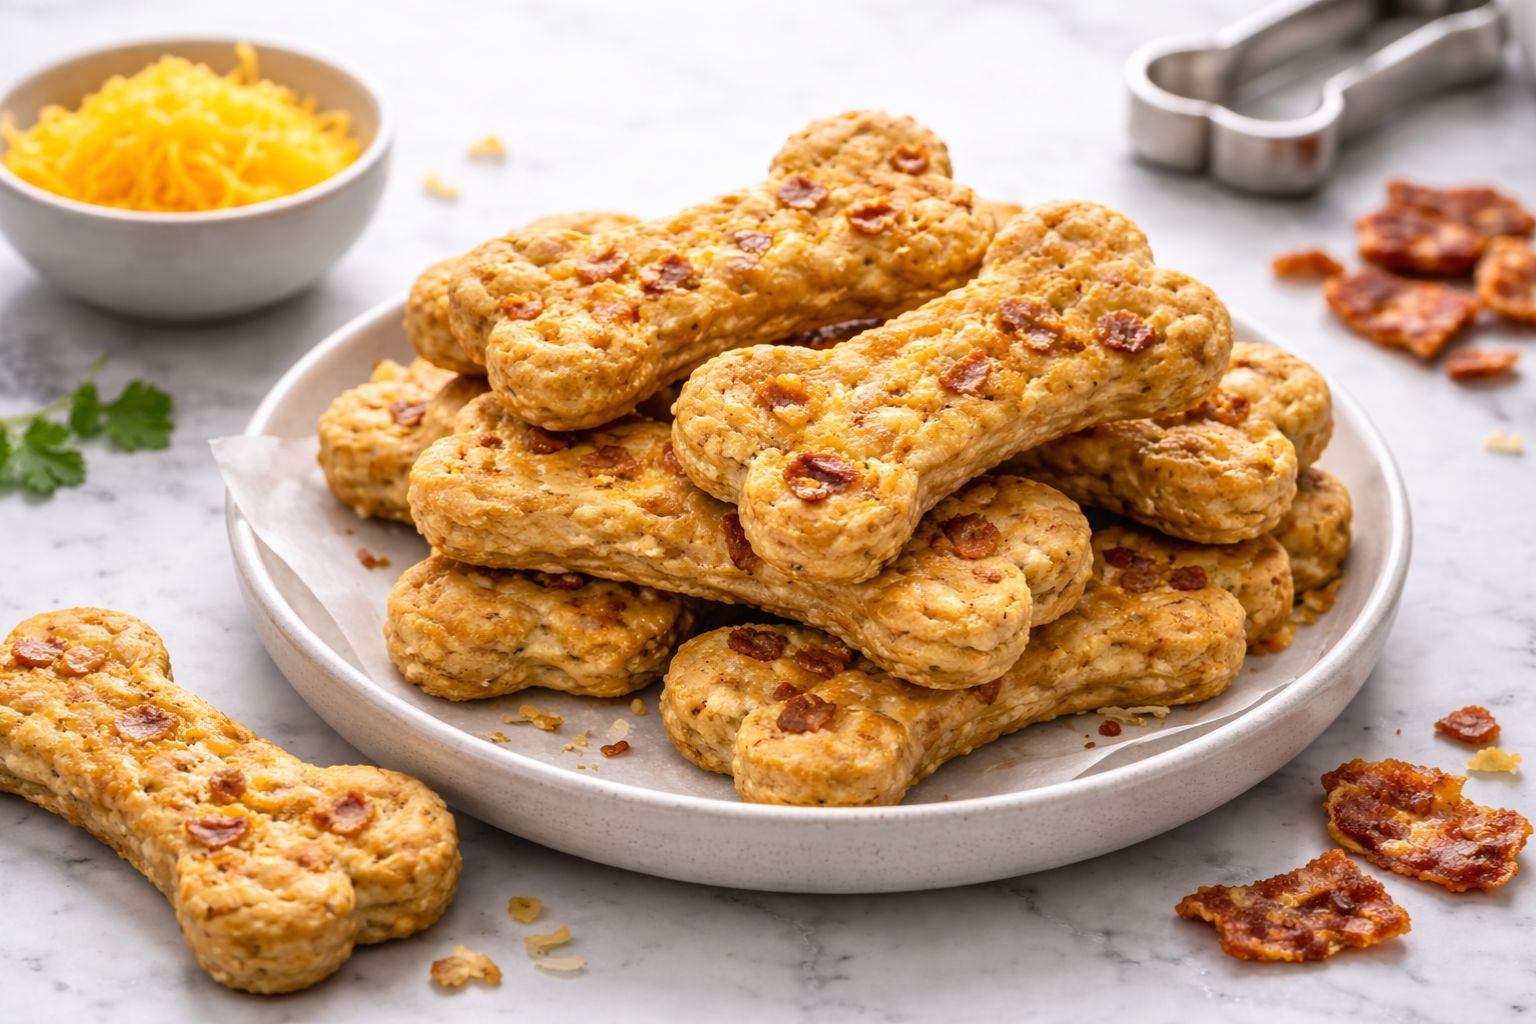
The Bacon & Cheese Dog Biscuits Recipe focuses on savory flavors dogs naturally enjoy. Bacon provides a rich smoky taste, while cheese adds a creamy, salty flavor that makes the biscuits extra appealing.
These biscuits are usually rolled out like cookie dough and cut into fun shapes before baking. Some people like using classic bone-shaped cutters, but any cookie cutter works just fine.
The final result is a firm, crunchy biscuit that dogs love to chew. They store well for days and make a great homemade alternative to packaged treats.
For me, the best part is seeing my dog’s excitement when I reach for the treat jar. That tail wag alone makes the effort completely worth it.
Equipment List
Before you begin making these dog biscuits, gather a few simple kitchen tools.
- Large mixing bowl
- Medium mixing bowl
- Measuring cups and spoons
- Rolling pin
- Baking sheet
- Parchment paper
- Cookie cutter (dog bone shape optional)
- Knife or pizza cutter
- Cooling rack
Nothing fancy is needed. These everyday tools will make the process smooth and enjoyable.
Recipe Card Info
Prep Time: 20 minutes
Cook Time: 25 minutes
Total Time: 45 minutes
Serves: About 25 biscuits
Cuisine: Homemade Pet Treat
Course: Dog Treats
Calories: 45 calories per biscuit
Ingredients
Dry Ingredients
- 2 cups whole wheat flour
- 1/2 cup rolled oats
Wet Ingredients
- 1 large egg
- 1/2 cup unsalted chicken broth
- 1/2 cup shredded cheddar cheese
- 3 slices cooked bacon, finely chopped
- 1 tablespoon olive oil
These ingredients are simple and easy to find. The bacon and cheese give the biscuits a delicious smell that dogs instantly recognize.
Instructions
Step 1: Preheat the Oven
Preheat your oven to 350°F (175°C). Line a baking sheet with parchment paper so the biscuits do not stick.
Step 2: Cook and Prepare the Bacon
Cook the bacon until crispy. Once cooled, chop it into very small pieces. The smaller the pieces, the easier they will mix into the dough.
Step 3: Mix the Dry Ingredients
In a large bowl, combine whole wheat flour and rolled oats. Stir them together so they are evenly distributed.
Step 4: Add the Wet Ingredients
Add the egg, chicken broth, shredded cheese, chopped bacon, and olive oil to the bowl. Stir until the mixture begins to form a dough.
Step 5: Knead the Dough
Transfer the dough onto a lightly floured surface. Knead it gently for about 2–3 minutes until it becomes smooth and firm.
If the dough feels too dry, add a tablespoon of chicken broth. If it feels sticky, sprinkle a little more flour.
Step 6: Roll Out the Dough
Use a rolling pin to roll the dough to about 1/4 inch thickness.
This thickness helps create biscuits that are crunchy but still easy for dogs to chew.
Step 7: Cut the Biscuits
Use a cookie cutter to cut the dough into shapes. Classic dog bone shapes are fun, but circles or squares work perfectly too.
Place the biscuits onto the prepared baking sheet.
Step 8: Bake the Biscuits
Bake for 20–25 minutes, or until the biscuits turn golden brown and slightly firm.
Your kitchen will start smelling like bacon and cheese at this point, and your dog will definitely notice.
Step 9: Cool Completely
Remove the biscuits from the oven and let them cool completely on a rack before serving.
Cooling helps them firm up into crunchy treats.

Why Homemade Dog Treats Are Worth It
Making your own dog treats might sound fancy at first, but it is actually very simple.
The biggest benefit is knowing exactly what your dog is eating. Store-bought treats sometimes contain preservatives, artificial flavors, or fillers.
When you make the Bacon & Cheese Dog Biscuits Recipe at home, you control every ingredient. That means fresh, simple, and recognizable foods.
It also allows you to adjust recipes based on your dog’s preferences.
And honestly, it is just fun. Watching your dog enjoy something you made yourself is incredibly rewarding.
Flavor and Texture
Dogs experience food differently than humans, but aroma plays a huge role in their enjoyment.
The Bacon & Cheese Dog Biscuits Recipe works so well because the smell of bacon is irresistible to most dogs. When combined with melted cheddar cheese, the biscuits develop a savory aroma that immediately grabs their attention.
The texture is crunchy but not overly hard. Baking them slowly removes moisture and creates that satisfying biscuit snap.
Dogs enjoy chewing them, which also helps keep their teeth active.
Tips for Perfect Dog Biscuits
Use Unsalted Bacon
Too much salt is not ideal for dogs, so try to use bacon with lower sodium when possible.
Chop Ingredients Finely
Small bacon pieces mix better into the dough and prevent crumbly biscuits.
Roll Dough Evenly
Keeping the dough thickness even ensures all biscuits bake at the same rate.
Bake Longer for Extra Crunch
If your dog prefers very crunchy treats, bake the biscuits an extra 5 minutes at a lower temperature.
Storage Tips
Homemade dog biscuits store surprisingly well.
Place cooled biscuits in an airtight container and keep them at room temperature for up to 5 days.
For longer storage, refrigerate them for up to two weeks.
You can also freeze the biscuits for up to 3 months.
When freezing, store them in a sealed freezer bag and thaw a few at a time as needed.
Variations
Peanut Butter Bacon Biscuits
Add 2 tablespoons natural peanut butter to the dough for an extra flavor dogs love.
Pumpkin Bacon Treats
Replace some broth with pumpkin puree for added fiber and nutrition.
Cheese Lover Version
Add a second type of cheese like parmesan for a stronger aroma.
When to Serve These Treats
The Bacon & Cheese Dog Biscuits Recipe is perfect for many situations.
You can use them as training rewards, small snacks between meals, or special weekend treats.
They also make adorable homemade gifts for friends who have dogs.
Just pack them into a small jar or treat bag.
FAQs
Can puppies eat these biscuits?
Yes, but they should be given in small portions. Make sure the biscuits are not too hard for very young puppies.
Can I use all-purpose flour?
Yes, although whole wheat flour adds more fiber and nutrition.
How many treats can I give my dog?
Treats should make up no more than 10% of a dog’s daily diet.
Can I skip the bacon?
Yes. The recipe will still work with just cheese for flavor.
Are homemade dog biscuits healthier?
Often yes, because they contain fewer additives and preservatives compared to many packaged treats.
Final Thoughts
Cooking for our pets is one of the sweetest ways to show love. The excitement in their eyes when they hear a treat jar open is something every dog owner understands.
This Bacon & Cheese Dog Biscuits Recipe is simple, wholesome, and incredibly rewarding to make. The ingredients are basic, the process is easy, and the result is a batch of crunchy homemade treats your dog will adore.
Every time I bake these biscuits, my dog sits patiently near the oven, tail wagging and nose in the air, waiting for the moment they finally cool down.
And honestly, that happy tail wag makes the whole recipe worth it.
More Recipes:

Bacon & Cheese Dog Biscuits Recipe
Equipment
- Large mixing bowl
- Medium mixing bowl
- Measuring cups and spoons.
- Rolling Pin
- Baking sheet
- Parchment paper
- Cookie cutter (dog bone shape optional)
- Knife or pizza cutter
- Cooling rack
Ingredients
Dry Ingredients
- 2 cups whole wheat flour
- 1/2 cup rolled oats
Wet Ingredients
- 1 large egg
- 1/2 cup unsalted chicken broth
- 1/2 cup shredded cheddar cheese
- 3 slices cooked bacon finely chopped
- 1 tablespoon olive oil
Instructions
Step 1: Preheat the Oven
- Preheat your oven to 350°F (175°C). Line a baking sheet with parchment paper so the biscuits do not stick.
Step 2: Cook and Prepare the Bacon
- Cook the bacon until crispy. Once cooled, chop it into very small pieces. The smaller the pieces, the easier they will mix into the dough.
Step 3: Mix the Dry Ingredients
- In a large bowl, combine whole wheat flour and rolled oats. Stir them together so they are evenly distributed.
Step 4: Add the Wet Ingredients
- Add the egg, chicken broth, shredded cheese, chopped bacon, and olive oil to the bowl. Stir until the mixture begins to form a dough.
Step 5: Knead the Dough
- Transfer the dough onto a lightly floured surface. Knead it gently for about 2–3 minutes until it becomes smooth and firm.
- If the dough feels too dry, add a tablespoon of chicken broth. If it feels sticky, sprinkle a little more flour.
Step 6: Roll Out the Dough
- Use a rolling pin to roll the dough to about 1/4 inch thickness.
- This thickness helps create biscuits that are crunchy but still easy for dogs to chew.
Step 7: Cut the Biscuits
- Use a cookie cutter to cut the dough into shapes. Classic dog bone shapes are fun, but circles or squares work perfectly too.
- Place the biscuits onto the prepared baking sheet.
Step 8: Bake the Biscuits
- Bake for 20–25 minutes, or until the biscuits turn golden brown and slightly firm.
- Your kitchen will start smelling like bacon and cheese at this point, and your dog will definitely notice.
Step 9: Cool Completely
- Remove the biscuits from the oven and let them cool completely on a rack before serving.
- Cooling helps them firm up into crunchy treats.

Hi, I’m Olivia Brooks! Cooking is my passion, and I love turning everyday ingredients into meals that bring joy to the table. On CulinaryPearl, I share simple recipes, helpful kitchen tips, and inspiration for food lovers everywhere