
Intro
Max and Ruby Dirt Cake Recipe is pure childhood nostalgia wrapped in chocolatey goodness, and honestly, it still makes me smile every time I make it. The first time I whipped this up, I felt like I was five years old again, sitting cross-legged in front of the TV, watching Max quietly cause chaos while Ruby tried to keep everything perfect. This dessert feels like that show. Playful, sweet, slightly messy, and full of joy.
As a chef, I cook plenty of fancy dishes. Sauces that take hours, plating that needs tweezers, flavors that whisper instead of shout. But this? This recipe reminds me why I fell in love with food in the first place. It is fun. It does not take itself seriously. And it makes people happy instantly.
This is the kind of dessert you make with kids, or when you want to feel like one again. It is creamy, chocolatey, crunchy, and just indulgent enough. No oven, no stress, no perfection needed. If you grew up watching Max and Ruby, or if you have little ones who love fun desserts, this one is for you.
What is Max and Ruby Dirt Cake?
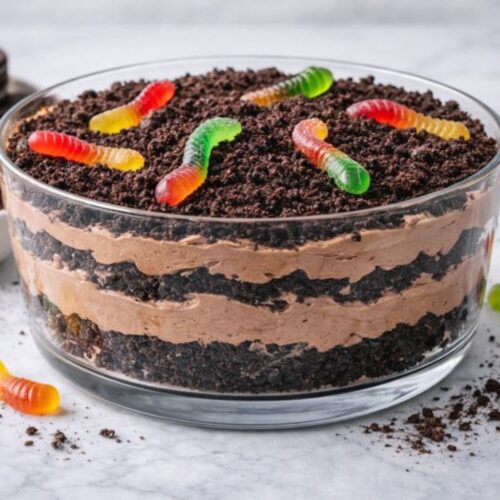
Max and Ruby Dirt Cake is a no-bake dessert made with layers of crushed chocolate sandwich cookies and a creamy pudding mixture. It looks like dirt, but tastes like heaven. The fun part is the presentation. You can decorate it with gummy worms, cookie crumbs, or even little toy shovels if you want to go all out.
The name comes from that playful, cartoon-inspired vibe. It is silly, cozy, and meant to spark imagination. Just like the show, it is simple on the surface but surprisingly comforting.
The texture is what really makes it special. You get the crunch of the cookies mixed with the smooth, fluffy cream filling. Every spoonful is balanced. Sweet but not too sweet. Rich but not heavy. It is one of those desserts where people say, just one more bite, and suddenly the bowl is empty.
I love this Max and Ruby Dirt Cake Recipe because it brings people together. Kids laugh while making it. Adults sneak bites from the fridge. It is not about being perfect. It is about having fun.
Equipment List
You do not need much to make this dessert, which is part of its charm.
- Large mixing bowl
- Medium mixing bowl
- Hand mixer or whisk
- Spatula
- Food processor or zip-top bag and rolling pin
- Measuring cups
- Serving dish or clear trifle bowl
Clear bowls are great because you can see the layers, but any dish works. Even a big glass baking dish does the job.
Ingredients
This recipe keeps things simple and familiar. No fancy ingredients here.
For the cream layer:
- 1 package cream cheese, softened
- 0.5 cup powdered sugar
- 1 teaspoon vanilla extract
- 1 package instant chocolate pudding mix
- 2 cups cold milk
- 1 tub whipped topping, thawed
For the dirt layer:
- 1 family-size pack chocolate sandwich cookies
Optional decorations:
- Gummy worms
- Crushed chocolate cookies
- Chocolate sprinkles
These ingredients come together in the most magical way. Simple pantry items, big payoff.
Instructions
Step 1: Crush the cookies
Place the cookies in a food processor and pulse until they look like fine dirt. If you do not have a processor, toss them in a zip-top bag and crush with a rolling pin. This step is very satisfying.
Set the crumbs aside.
Step 2: Make the cream base
In a large bowl, beat the softened cream cheese until smooth. Add powdered sugar and vanilla, then mix until creamy and lump-free.
In another bowl, whisk the pudding mix with cold milk until thick. Let it sit for a minute.
Step 3: Combine the layers
Fold the pudding mixture into the cream cheese mixture gently. Then fold in the whipped topping until everything looks fluffy and smooth.
This is where the magic happens. The texture should be light, creamy, and irresistible.
Step 4: Assemble the dirt cake
In your serving dish, add a layer of cookie crumbs. Then add a layer of the cream mixture. Repeat until you reach the top, finishing with cookie crumbs.
Decorate with gummy worms or extra crumbs if you like.
Step 5: Chill
Cover and refrigerate for at least two hours. Overnight is even better. The flavors settle, and the texture becomes perfect.
Why Kids Love This Dessert
Kids love this dessert because it feels like play. They get to crush cookies, layer ingredients, and decorate without worrying about being neat. It is hands-on, colorful, and silly in the best way.
This Max and Ruby Dirt Cake Recipe is also forgiving. No baking, no timing stress, no exact measurements needed. That makes it perfect for little helpers.

Why Adults Love It Too
Do not let the playful look fool you. This dessert is seriously good. Cream cheese adds richness, pudding adds chocolate depth, and cookies add crunch. It hits all the right notes.
Plus, it is nostalgic. One bite and you are back in simpler times. Sometimes, that is exactly what we need.
Flavor and Texture Breakdown
The flavor is chocolate-forward but not overpowering. The cream cheese brings a slight tang that balances the sweetness. The cookies soften slightly as they chill, creating that perfect mix of creamy and crunchy.
It is light enough to eat after a big meal but rich enough to feel like a treat.
Variations to Try
- Use vanilla pudding for a lighter flavor
- Add peanut butter to the cream layer
- Try chocolate graham crackers instead of cookies
- Make individual cups for parties
This recipe loves creativity.
Make-Ahead and Storage Tips
This dessert is best made ahead. It keeps well in the fridge for up to three days. Cover tightly to keep it fresh.
I actually think it tastes better the next day, once everything has had time to mingle.
Serving Ideas
Serve this dessert cold, straight from the fridge. Add extra gummy worms right before serving for fun. For parties, individual cups make it easy and cute.
If you want to be extra playful, serve it with little spoons or themed decorations.
Why This Recipe Has a Special Place in My Heart
As a female chef, I spend a lot of time perfecting dishes. This one reminds me that food does not always need to be serious. Sometimes, it just needs to make people smile.
The Max and Ruby Dirt Cake Recipe is one of those desserts that brings laughter into the kitchen. That is something I treasure deeply.
Final Thoughts
If you are looking for a dessert that is easy, nostalgic, and guaranteed to please, this is it. Make it with kids, make it for a party, or make it just because you want something sweet and comforting.
Cooking should be joyful. This dirt cake proves that sometimes, the messier the dessert, the better the memories.
Grab a spoon, dig in, and enjoy every bite.
Max and Ruby Dirt Cake Recipe
Equipment
- Large mixing bowl
- Medium mixing bowl
- Hand mixer or whisk
- Spatula
- Food processor or zip-top bag and rolling pin
- Measuring cups
- Serving dish or clear trifle bowl
Ingredients
For the cream layer:
- 1 package cream cheese softened
- 0.5 cup powdered sugar
- 1 teaspoon vanilla extract
- 1 package instant chocolate pudding mix
- 2 cups cold milk
- 1 tub whipped topping thawed
For the dirt layer:
- 1 family-size pack chocolate sandwich cookies
Optional decorations:
- Gummy worms
- Crushed chocolate cookies
- Chocolate sprinkles
Instructions
Step 1: Crush the cookies
- Place the cookies in a food processor and pulse until they look like fine dirt. If you do not have a processor, toss them in a zip-top bag and crush with a rolling pin. This step is very satisfying.
- Set the crumbs aside.
Step 2: Make the cream base
- In a large bowl, beat the softened cream cheese until smooth. Add powdered sugar and vanilla, then mix until creamy and lump-free.
- In another bowl, whisk the pudding mix with cold milk until thick. Let it sit for a minute.
Step 3: Combine the layers
- Fold the pudding mixture into the cream cheese mixture gently. Then fold in the whipped topping until everything looks fluffy and smooth.
- This is where the magic happens. The texture should be light, creamy, and irresistible.
Step 4: Assemble the dirt cake
- In your serving dish, add a layer of cookie crumbs. Then add a layer of the cream mixture. Repeat until you reach the top, finishing with cookie crumbs.
- Decorate with gummy worms or extra crumbs if you like.
Step 5: Chill
- Cover and refrigerate for at least two hours. Overnight is even better. The flavors settle, and the texture becomes perfect.

Hi, I’m Olivia Brooks! Cooking is my passion, and I love turning everyday ingredients into meals that bring joy to the table. On CulinaryPearl, I share simple recipes, helpful kitchen tips, and inspiration for food lovers everywhere