
A must-try Mingua Beef Jerky recipe featuring a simple marinade, air-dry or oven-friendly method, and intense beef flavor.
Intro
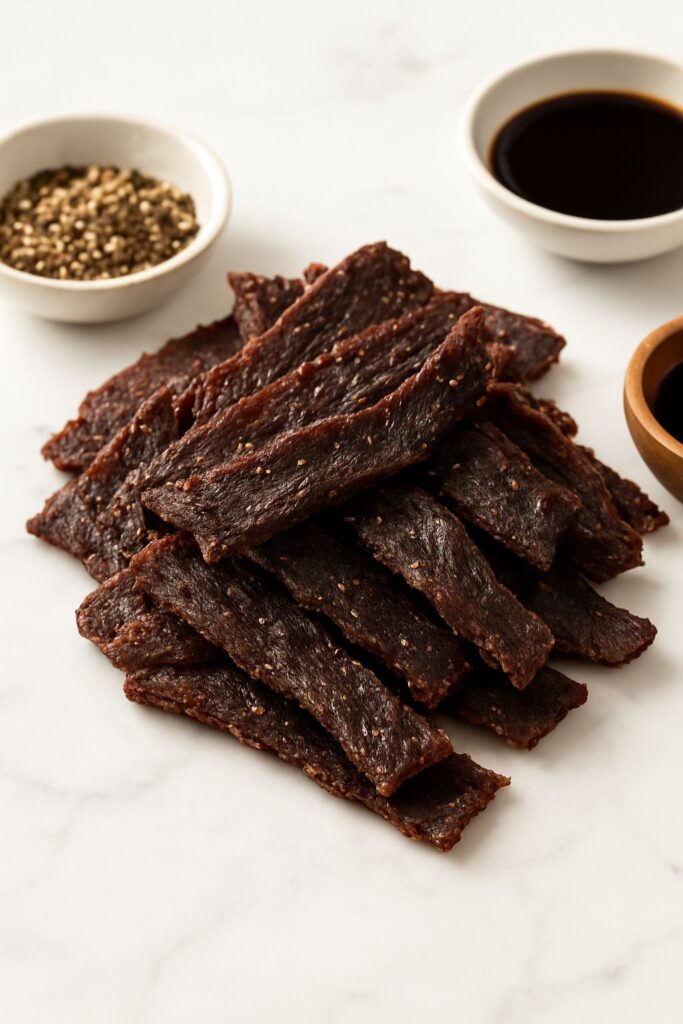
A good beef jerky is magic — the kind that hits you with that smoked aroma the second you open the pack, the kind that’s chewy (not tough), salty with a hint of sweet, and the kind that sticks to your tongue so you keep going back for piece after piece after piece. And that is exactly what happened when I first tried Mingua Beef Jerky, the well-known Kentucky-style jerky with its aggressive seasoning, rough chew, and unmistakably home-cooked character.
And since I am the home-cooking-obsessed woman that I am, my first thought was:
“OK… how do I make this at home?”
There’s nothing I love more than recreating classic flavors — especially the old-fashioned, handcrafted ones.
After a long (and spicy) journey of experimentation, taste testing, and a few batches that were way too salty (we shall not discuss those 𝄻), I finally nailed it. This Copycat Mingua Beef Jerky Recipe delivers that salty-savory Kentucky bite with the perfect heat and chew.
And now it’s your turn.
What Is Mingua Beef Jerky?
If you’re new to the brand, Mingua Beef Jerky is a Kentucky-made jerky known for:
- Lean beef strips
- A salty, savory marinade
- A touch of sugar
- Peppery heat
- Minimal additives
The texture is dry, rough, and chewy — unmistakably handmade.
It’s the kind of jerky people smoke behind your uncle’s barn — it’s that good.
The best part?
You can make your own version at home… and honestly, it’s even better because you control the heat, the saltiness, the sweetness, and the chew.
How I Discovered This (Short & To the Point)
My first taste of Mingua Beef Jerky was on a road trip across Kentucky. I grabbed a bag because it looked “family-made and old-fashioned.” One bite later… hooked. By the end of the trip, I had three more bags in the car and a mission: recreate that flavor at home.
After dozens of test batches, plenty of spicy chaos, and questions my husband refused to answer, I finally arrived here — a perfect homemade version.
Equipment List
You don’t need a smokehouse or fancy tools. Just:
- Sharp knife
- Cutting board
- Large zip-top bag or mixing bowl
- Dehydrator or oven
- Wire rack (if using oven)
- Baking sheet
- Paper towels
- Airtight jars or containers
Optional but lovely:
- Vacuum sealer
- Jerky gun (if making ground-beef jerky)
Recipe Card:
Prep Time: 15 minutes
Marinating Time: 12 hours
Cook/Dry Time: 3–5 hours
Total Time: 12–16 hours
Servings: About 1 pound of jerky
Ingredients
For the Beef
- 2 lbs lean beef (top round, eye of round, or flank steak)
For the Marinade
- ½ cup soy sauce
- ⅓ cup Worcestershire sauce
- 2 tbsp brown sugar
- 2 tsp onion powder
- 2 tsp garlic powder
- 1 tsp smoked paprika
- ½–1 tsp coarse black pepper
- 1 tsp red pepper flakes (adjust to taste)
- ½ tsp liquid smoke (optional but great)
- 1 tbsp apple cider vinegar
- 1 tsp kosher salt
- 1 tbsp honey or maple syrup (optional for shine & balance)
Instructions
Step 1: Prep the Beef
This step determines your chew.
- Freeze beef for 30–45 minutes until firm but not frozen solid.
- Slice against the grain for tender jerky, or with the grain for traditional Mingua chew.
- Aim for ⅛–¼ inch slices.
Step 2: Make the Marinade
In a bowl, mix:
Soy sauce, Worcestershire, garlic, onion, paprika, black pepper, red pepper flakes, vinegar, honey, and liquid smoke.
Taste it.
It should be salty, bold, a touch sweet, and slightly spicy.
It will mellow during drying.
Step 3: Marinate the Beef
- Add beef strips to the marinade and coat well.
- Refrigerate:
- Minimum: 6 hours
- Best: Overnight
- Maximum flavor: 24 hours
- Minimum: 6 hours
More time = deeper flavor.
Step 4: Dry the Beef
Blot each strip with paper towels. This helps:
- Faster drying
- Better texture
- More even caramelization
Step 5: Dehydrate or Bake
If using a dehydrator:
- Lay strips in one layer
- Dry at 160°F for 4–6 hours
- Check for your preferred texture
If using an oven:
- Preheat to 170–175°F
- Place strips on a wire rack over a baking sheet
- Dry for 3.5–5 hours, flipping halfway
You want them dry but still pliable, not brittle.
Step 6: Cool & Store
Let the jerky cool completely to lock in texture.
Store in:
- Airtight jars
- Zip-top bags
- Vacuum-sealed bags (best for long-term)
Shelf life:
- 1 week at room temp
- 3 weeks refrigerated
- 2–3 months frozen
Why This Tastes Like Mingua
Mingua jerky has a simple but sharp flavor profile:
- Salty Base: Soy + Worcestershire
- Savory Backbone: Garlic, onion, paprika
- Peppery Hit: Coarse black pepper (don’t skip!)
- Subtle Heat: Red pepper flakes
- Bare Sweetness: Brown sugar + touch of honey
- Tang: Apple cider vinegar
- Smokiness: Liquid smoke
Together, they create a salty, chewy, peppery, slightly spicy Kentucky-style jerky.
Choosing the Right Beef Cut
The best Mingua-style cuts:
- Top Round – classic jerky texture
- Eye of Round – very lean, very chewy
- Flank Steak – great flavor, fibrous
- Sirloin Tip – mild & tender
Avoid fatty cuts — fat spoils faster.
Cutting: With or Against the Grain?
- Against the grain: Softer bite
- With the grain: Tougher traditional chew
Mingua leans chewier, so slicing with the grain is most authentic.
Tips for Perfect Mingua-Style Jerky
- Don’t over-salt the marinade
- Dry the surface before dehydrating
- Keep sugar minimal
- Use low-and-slow heat
- Let the jerky rest after drying
Serving Ideas (Jerky Is More Versatile Than You Think)
Use jerky in:
- Ramen
- Fried rice
- Omelets
- Pizza (trust me)
- Charcuterie boards
- Scrambled eggs
- Trail mix
Storage & Shelf Life
- Room Temp: 1 week
- Refrigerator: 3 weeks
- Frozen: Up to 3 months (vacuum-sealed)
Mingua Beef Jerky Recipe: Final Words
Homemade jerky is unbelievably good, and this Mingua Beef Jerky Recipe captures the spirit of a local legend. The chew, the salt, the pepper, the simplicity — it all comes together in this nostalgic, no-frills snack.
If you love jerky, you’ll love this. And once you master the base?
Make it your own — smoky, spicy, garlicky, sweeter — however you like it.
More Side Dish Recipes:
- Saltgrass Green Beans Recipe
- Cheesecake Factory Caesar Salad Dressing Recipe
- Culver’s Coleslaw Recipe

Mingua Beef Jerky Recipe
Equipment
- Sharp knife
- Cutting board
- Large zip-top bag or mixing bowl
- Dehydrator or oven
- Wire rack (if using oven)
- Baking sheet
- Paper towels
- Airtight jars or containers
- Optional but lovely:
- Vacuum sealer
- Jerky gun (if making ground-beef jerky)
Ingredients
For the Beef
- 2 lbs lean beef top round, eye of round, or flank steak
For the Marinade
- ½ cup soy sauce
- ⅓ cup Worcestershire sauce
- 2 tbsp brown sugar
- 2 tsp onion powder
- 2 tsp garlic powder
- 1 tsp smoked paprika
- ½ –1 tsp coarse black pepper
- 1 tsp red pepper flakes adjust to taste
- ½ tsp liquid smoke optional but great
- 1 tbsp apple cider vinegar
- 1 tsp kosher salt
- 1 tbsp honey or maple syrup optional for shine & balance
Instructions
Step 1: Prep the Beef
- This step determines your chew.
- Freeze beef for 30–45 minutes until firm but not frozen solid.
- Slice against the grain for tender jerky, or with the grain for traditional Mingua chew.
- Aim for ⅛–¼ inch slices.
Step 2: Make the Marinade
- In a bowl, mix:
- Soy sauce, Worcestershire, garlic, onion, paprika, black pepper, red pepper flakes, vinegar, honey, and liquid smoke.
- Taste it.
- It should be salty, bold, a touch sweet, and slightly spicy.
- It will mellow during drying.
Step 3: Marinate the Beef
- Add beef strips to the marinade and coat well.
- Refrigerate:
- Minimum: 6 hours
- Best: Overnight
- Maximum flavor: 24 hours
- More time = deeper flavor.
Step 4: Dry the Beef
- Blot each strip with paper towels. This helps:
- Faster drying
- Better texture
- More even caramelization
Step 5: Dehydrate or Bake
If using a dehydrator:
- Lay strips in one layer
- Dry at 160°F for 4–6 hours
- Check for your preferred texture
If using an oven:
- Preheat to 170–175°F
- Place strips on a wire rack over a baking sheet
- Dry for 3.5–5 hours, flipping halfway
- You want them dry but still pliable, not brittle.
Step 6: Cool & Store
- Let the jerky cool completely to lock in texture.
Store in:
- Airtight jars
- Zip-top bags
- Vacuum-sealed bags (best for long-term)
Shelf life:
- 1 week at room temp
- 3 weeks refrigerated
- 2–3 months frozen

Hi, I’m Olivia Brooks! Cooking is my passion, and I love turning everyday ingredients into meals that bring joy to the table. On CulinaryPearl, I share simple recipes, helpful kitchen tips, and inspiration for food lovers everywhere