Intro
Some desserts make people smile politely. And then some desserts make people’s eyes go wide before they even take a bite. This Peanut Butter Cup Chocolate Roll is absolutely the second kind.
I still remember the first time I made it. I had been craving that irresistible combination of chocolate and peanut butter — that creamy, salty-sweet balance that feels almost nostalgic. I didn’t want cookies. I didn’t want brownies. I wanted something dramatic. Something that would look beautiful on a serving plate but still taste like pure comfort.
That’s how this roll was born in my kitchen.
As a female chef who grew up believing dessert is an experience, not just a sweet ending, I adore recipes that feel special but are secretly simple. This Peanut Butter Cup Chocolate Roll looks like something from a bakery display case.
But when you break it down? It’s soft chocolate sponge cake, a creamy peanut butter filling, and chopped peanut butter cups tucked inside like little hidden treasures.
Every slice gives you swirls of chocolate and peanut butter. Every bite melts softly, then surprises you with that familiar candy-like richness. It’s playful. It’s indulgent. And honestly? It’s impossible to resist.
Let me walk you through everything.
What is Peanut Butter Cup Chocolate Roll?
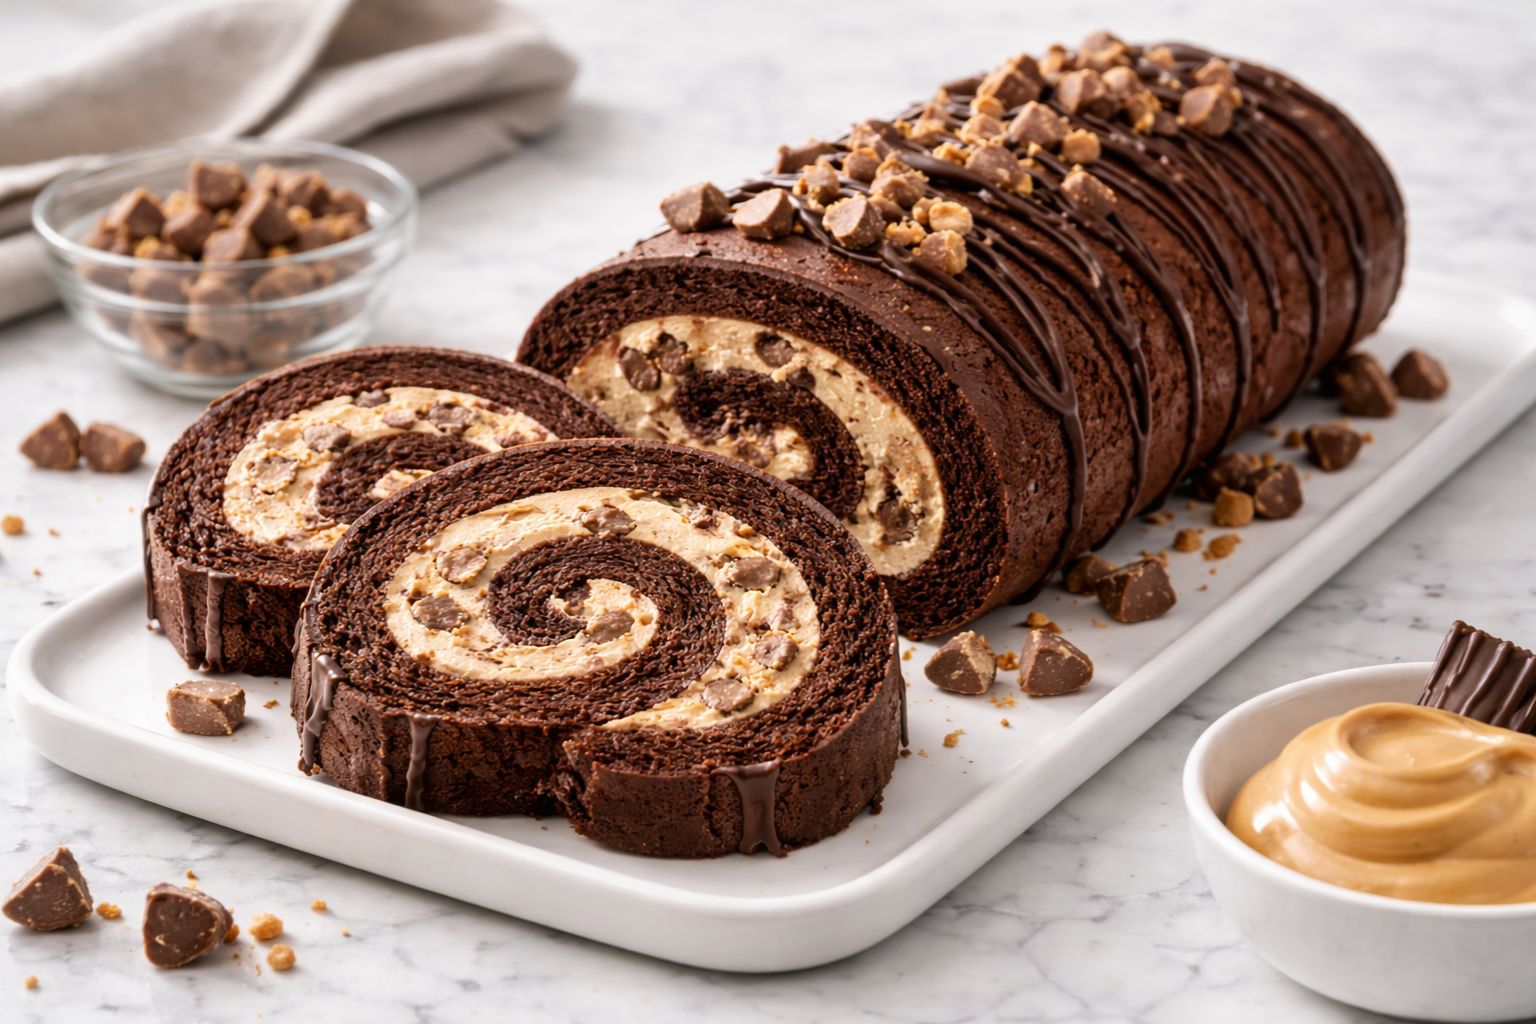
A Peanut Butter Cup Chocolate Roll is a rolled chocolate sponge cake filled with a fluffy peanut butter cream and pieces of peanut butter cups. Think of it like a Swiss roll — but richer, creamier, and packed with that iconic chocolate-peanut butter flavor combination.
The outer layer is a light, flexible chocolate sponge cake made with cocoa powder, eggs, sugar, and flour. It’s baked thin so it can roll without cracking. Inside, the filling is smooth peanut butter blended with cream cheese, powdered sugar, and whipped cream. And then — the magic — chopped peanut butter cups are folded into the filling for texture and bursts of extra sweetness.
Once rolled and chilled, it slices beautifully into spirals that show off that gorgeous swirl. It looks impressive, but the steps are completely manageable, even if you’ve never rolled a cake before.
And trust me, once you master this technique, you’ll feel unstoppable in your kitchen.
Equipment List
Before we begin, let’s gather what you need. Preparation makes baking feel calm and joyful.
- 10×15-inch jelly roll pan
- Parchment paper
- Mixing bowls (large and medium)
- Electric hand mixer or stand mixer
- Rubber spatula
- Fine mesh sieve (for dusting powdered sugar)
- Clean kitchen towel
- Cooling rack
- Offset spatula (helpful for spreading filling)
- Sharp serrated knife (for slicing)
Nothing too fancy. Just simple tools that help us create something beautiful.
Recipe Card Info
Prep Time: 25 minutes
Cook Time: 12–15 minutes
Chill Time: 1 hour
Total Time: About 1 hour 45 minutes
Serves: 8–10 slices
Cuisine: American
Course: Dessert
Calories: Approximately 420 per slice
Ingredients
For the Chocolate Sponge Cake
- 3/4 cup all-purpose flour
- 1/4 cup unsweetened cocoa powder
- 1 teaspoon baking powder
- 1/4 teaspoon salt
- 4 large eggs, room temperature
- 3/4 cup granulated sugar
- 1 teaspoon vanilla extract
- 2 tablespoons milk
For the Peanut Butter Filling
- 1 cup creamy peanut butter
- 4 ounces cream cheese, softened
- 1 cup powdered sugar
- 1 teaspoon vanilla extract
- 1 cup heavy whipping cream
- 1 cup chopped peanut butter cups
Optional Garnish
- Melted chocolate drizzle
- Extra chopped peanut butter cups
- Powdered sugar for dusting
Each ingredient plays a role. The eggs give the sponge flexibility. The cocoa powder provides rich chocolate depth. The peanut butter brings that salty creaminess. Cream cheese adds structure and tang. Powdered sugar sweetens smoothly. And the peanut butter cups? They make it unforgettable.
Instructions
Step 1: Prepare the Pan
Preheat your oven to 350°F (175°C). Line your jelly roll pan with parchment paper, leaving a little overhang on the sides. Lightly grease the parchment.
Step 2: Mix Dry Ingredients
In a medium bowl, whisk together flour, cocoa powder, baking powder, and salt. Set aside.
Step 3: Beat Eggs and Sugar
In a large bowl, beat the eggs and sugar together for about 4–5 minutes. The mixture should become pale, thick, and fluffy. This step is crucial. It gives the cake its structure and flexibility.
Add vanilla extract and milk. Mix gently.
Step 4: Combine Batter
Gradually fold the dry ingredients into the egg mixture using a spatula. Be gentle. You want to keep as much air as possible in the batter.
Spread the batter evenly into the prepared pan.
Step 5: Bake
Bake for 12–15 minutes. The cake should spring back lightly when touched. Do not overbake — that causes cracking later.
Step 6: Roll While Warm
Place a clean kitchen towel on your counter and dust it generously with powdered sugar. Turn the warm cake out onto the towel. Carefully peel off parchment paper.
Starting from the short end, gently roll the cake up with the towel inside. Let it cool completely in this rolled shape.
Step 7: Prepare Filling
Beat peanut butter and cream cheese until smooth. Add powdered sugar and vanilla. Mix until creamy.
In a separate bowl, whip heavy cream until stiff peaks form. Fold the whipped cream into the peanut butter mixture gently.
Fold in chopped peanut butter cups.
Step 8: Fill and Roll Again
Carefully unroll the cooled cake. Spread the filling evenly across the surface, leaving a small border around the edges.
Roll the cake back up without the towel. Wrap tightly in plastic wrap and refrigerate for at least one hour.
Step 9: Slice and Serve
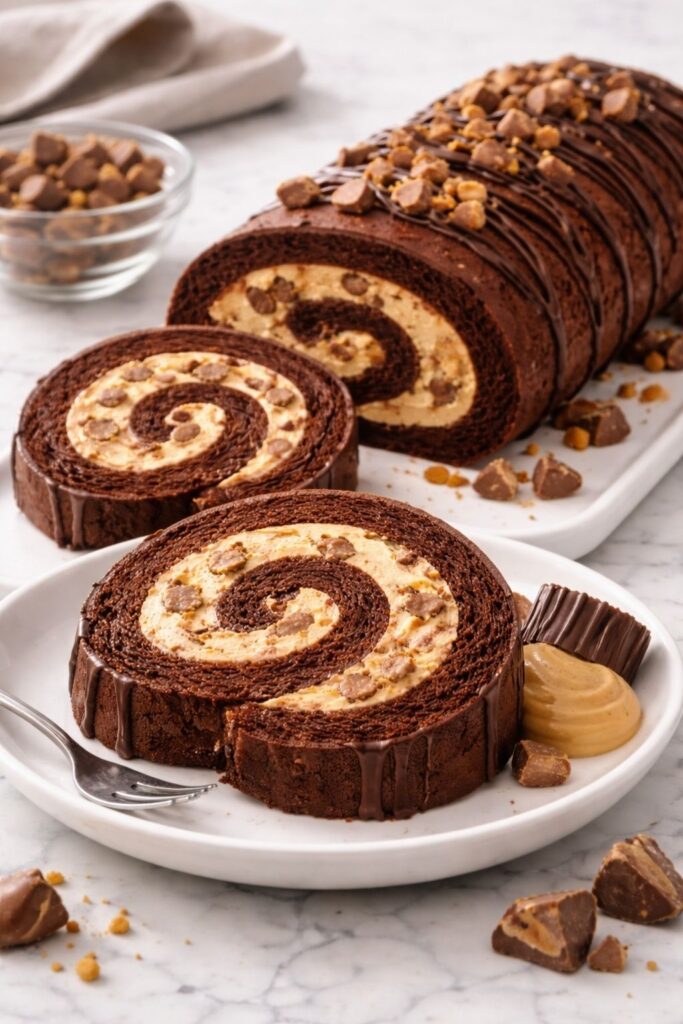
Trim the ends for clean edges. Slice into rounds. Garnish if desired.
And just like that, you have a stunning Peanut Butter Cup Chocolate Roll.
The Flavor Experience
Let me describe the first bite.
The chocolate sponge is soft and tender — not dense like a brownie, but light and slightly airy. It melts quickly on your tongue.
Then comes the filling. Creamy peanut butter blended with sweet powdered sugar and fluffy whipped cream. It’s smooth, rich, but not heavy.
And then — little bits of peanut butter cups. Slightly firmer. Slightly sweeter. That familiar chocolate shell and creamy peanut center.
The combination is balanced. Sweet but not cloying. Creamy but not overwhelming. Each slice has that beautiful swirl that makes you pause for a second before diving in.
Why This Recipe Works
There’s a science to roll cakes.
Beating the eggs and sugar properly creates structure without needing a lot of fat. Baking the cake thin keeps it flexible. Rolling it while warm trains the cake to hold its shape.
The filling works because the cream cheese stabilizes the peanut butter. Whipped cream lightens the texture. The chopped peanut butter cups add contrast.
Every component supports the other.
Tips for Success
Don’t Overbake
Even two extra minutes can dry out the sponge.
Roll While Warm
If you wait until it cools completely, it may crack.
Chill Before Slicing
Cold filling gives you clean, beautiful spirals.
Use Creamy Peanut Butter
Natural peanut butter can separate and affect texture.
Serving Ideas
This roll shines on its own, but you can elevate it further:
- Serve with vanilla ice cream
- Drizzle warm chocolate ganache
- Add crushed peanuts on top
- Pair with strong coffee
It’s perfect for birthdays, holidays, dinner parties, or just because you need chocolate therapy.
Make-Ahead and Storage
You can prepare this Peanut Butter Cup Chocolate Roll one day in advance. Store tightly wrapped in the refrigerator.
It keeps well for up to 3 days. The flavors actually deepen overnight.
You can also freeze it (without garnish) for up to one month. Thaw overnight in the refrigerator.
Variations to Try
Dark Chocolate Version
Use dark cocoa powder for deeper flavor.
Crunchy Peanut Butter
For extra texture, substitute part of the creamy peanut butter with crunchy.
Chocolate Ganache Coating
Cover the entire roll with glossy ganache for a more dramatic finish.
Mini Rolls
Divide the batter into two smaller pans and create mini rolls for parties.
Frequently Asked Questions
Can I Make It Gluten-Free?
Yes, substitute a 1:1 gluten-free flour blend.
Can I Use Store-Bought Whipped Topping?
You can, but fresh whipped cream tastes better and feels lighter.
Why Did My Cake Crack?
It may have been overbaked or not rolled while warm.
A Personal Note from My Kitchen
There’s something empowering about mastering a roll cake. The first time feels intimidating. The second time feels exciting. By the third time, you feel like a pastry chef.
As a woman who built confidence in the kitchen step by step, I love recipes like this. They remind us that impressive doesn’t mean impossible.
This Peanut Butter Cup Chocolate Roll has become one of my signature desserts. It’s the one friends request. It’s the one that disappears first at gatherings. It’s the one that makes people ask, “You made this?” with surprise in their voice.
And that reaction? That’s why we bake.
Final Thoughts
Chocolate and peanut butter will always be a classic pairing. But when you transform those flavors into a soft, swirled, cream-filled cake roll, something magical happens.
This Peanut Butter Cup Chocolate Roll is rich yet light, indulgent yet balanced, beautiful yet comforting. It’s the kind of dessert that feels special without requiring complicated techniques.
So roll up your sleeves. Dust that towel with powdered sugar. Beat those eggs until fluffy. And create something that looks like it came from a bakery — but tastes even better because it came from your kitchen.
And when you slice into that perfect spiral, take a moment. Admire it. Then take a bite.
That’s the sweet reward.
More Recipes:
Peanut Butter Cup Chocolate Roll Recipe
Equipment
- 10×15-inch jelly roll pan
- Parchment paper
- Mixing bowls (large and medium).
- Electric hand mixer or stand mixer
- Rubber spatula
- Fine mesh sieve (for dusting powdered sugar)
- Clean kitchen towel
- Cooling rack
- Offset spatula (helpful for spreading filling)
- Sharp serrated knife (for slicing)
Ingredients
For the Chocolate Sponge Cake
- 3/4 cup all-purpose flour
- 1/4 cup unsweetened cocoa powder
- 1 teaspoon baking powder
- 1/4 teaspoon salt
- 4 large eggs room temperature
- 3/4 cup granulated sugar
- 1 teaspoon vanilla extract
- 2 tablespoons milk
For the Peanut Butter Filling
- 1 cup creamy peanut butter
- 4 ounces cream cheese softened
- 1 cup powdered sugar
- 1 teaspoon vanilla extract
- 1 cup heavy whipping cream
- 1 cup chopped peanut butter cups
Optional Garnish
- Melted chocolate drizzle
- Extra chopped peanut butter cups
- Powdered sugar for dusting
Instructions
Step 1: Prepare the Pan
- Preheat your oven to 350°F (175°C). Line your jelly roll pan with parchment paper, leaving a little overhang on the sides. Lightly grease the parchment.
Step 2: Mix Dry Ingredients
- In a medium bowl, whisk together flour, cocoa powder, baking powder, and salt. Set aside.
Step 3: Beat Eggs and Sugar
- In a large bowl, beat the eggs and sugar together for about 4–5 minutes. The mixture should become pale, thick, and fluffy. This step is crucial. It gives the cake its structure and flexibility.
- Add vanilla extract and milk. Mix gently.
Step 4: Combine Batter
- Gradually fold the dry ingredients into the egg mixture using a spatula. Be gentle. You want to keep as much air as possible in the batter.
- Spread the batter evenly into the prepared pan.
Step 5: Bake
- Bake for 12–15 minutes. The cake should spring back lightly when touched. Do not overbake — that causes cracking later.
Step 6: Roll While Warm
- Place a clean kitchen towel on your counter and dust it generously with powdered sugar. Turn the warm cake out onto the towel. Carefully peel off parchment paper.
- Starting from the short end, gently roll the cake up with the towel inside. Let it cool completely in this rolled shape.
Step 7: Prepare Filling
- Beat peanut butter and cream cheese until smooth. Add powdered sugar and vanilla. Mix until creamy.
- In a separate bowl, whip heavy cream until stiff peaks form. Fold the whipped cream into the peanut butter mixture gently.
- Fold in chopped peanut butter cups.
Step 8: Fill and Roll Again
- Carefully unroll the cooled cake. Spread the filling evenly across the surface, leaving a small border around the edges.
- Roll the cake back up without the towel. Wrap tightly in plastic wrap and refrigerate for at least one hour.
Step 9: Slice and Serve
- Trim the ends for clean edges. Slice into rounds. Garnish if desired.
- And just like that, you have a stunning Peanut Butter Cup Chocolate Roll.

Hi, I’m Olivia Brooks! Cooking is my passion, and I love turning everyday ingredients into meals that bring joy to the table. On CulinaryPearl, I share simple recipes, helpful kitchen tips, and inspiration for food lovers everywhere