Intro
There are some cakes you bake for cravings, and then there are cakes you bake for moments. Birthdays. Brunches. Spring afternoons when you want something fresh, colorful, and joyful. That’s exactly what this Fruit Basket Cake Recipe is to me—a celebration cake that feels light, happy, and a little magical.
The first time I made this cake, I wanted something different from heavy chocolate layers and thick frosting. I wanted a cake that looked like sunshine on a plate. Something soft, lightly sweet, and bursting with fresh fruit. Something that feels homemade but still looks like it belongs on a bakery display.
This fruit basket cake became that recipe. And once you bake it, you’ll understand why it always steals the show.
What Is a Fruit Basket Cake?
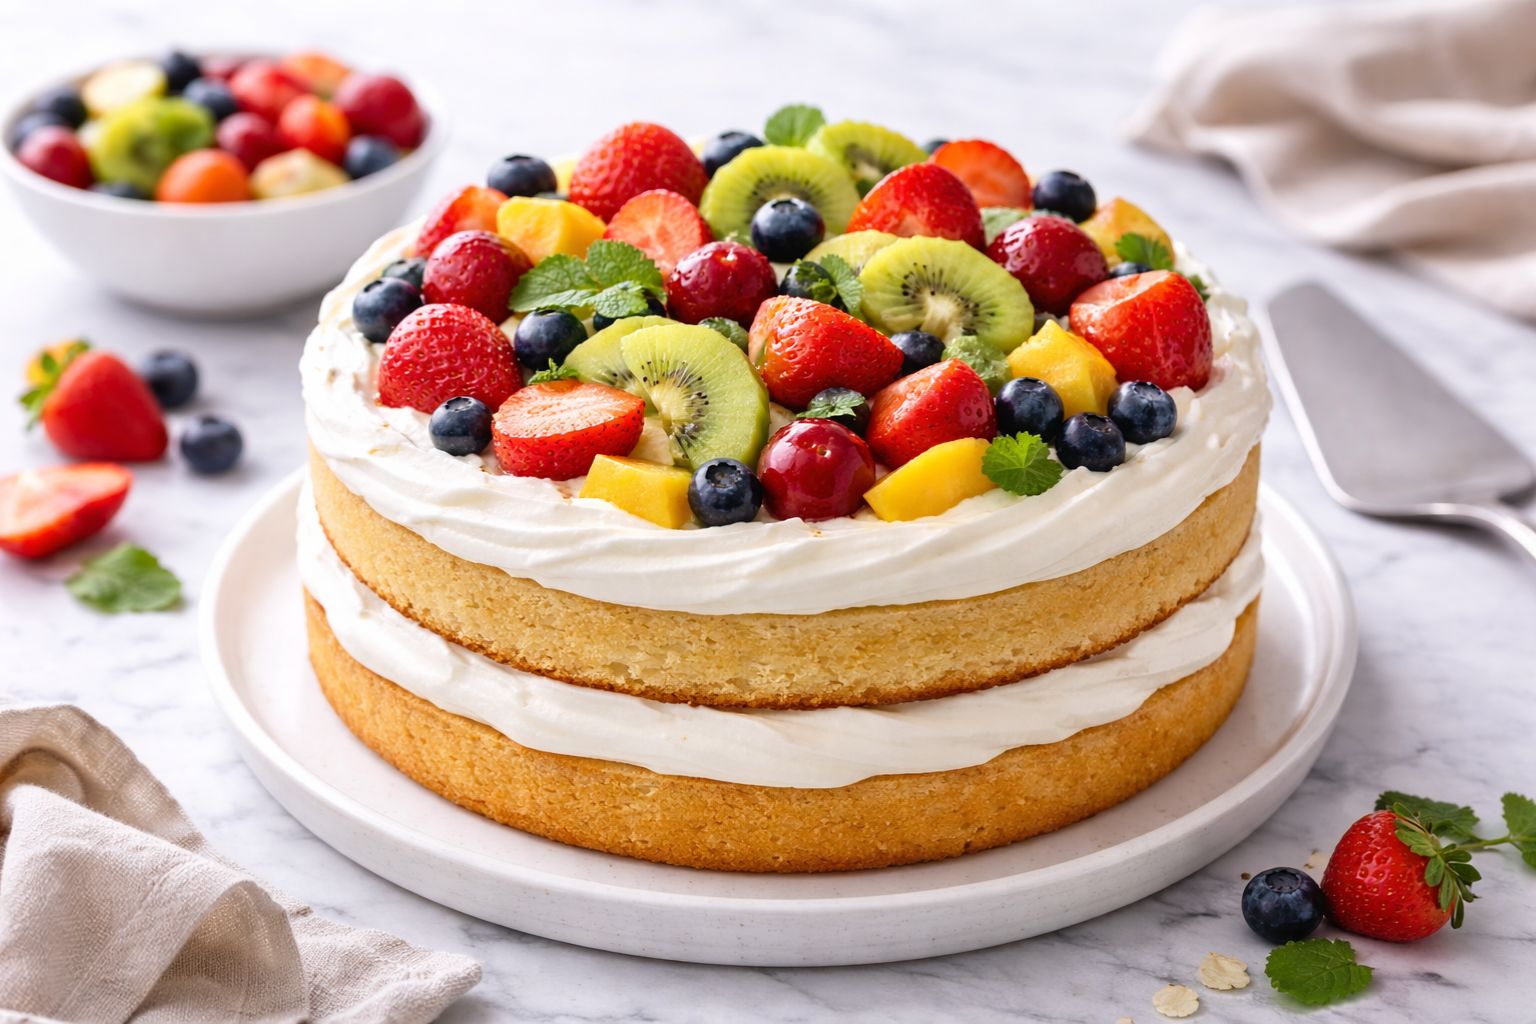
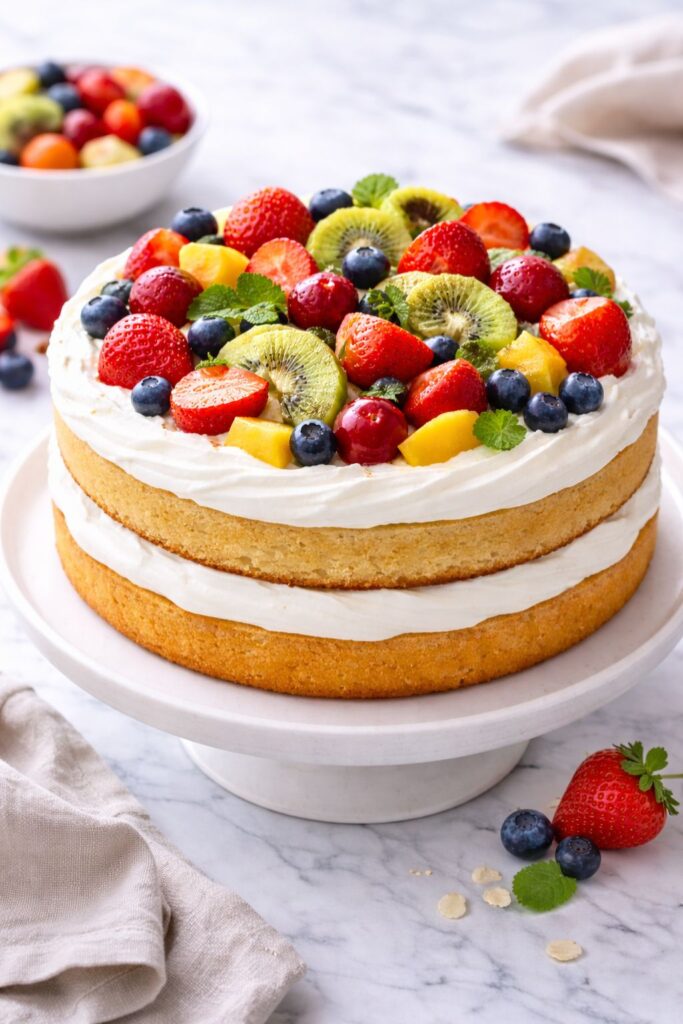
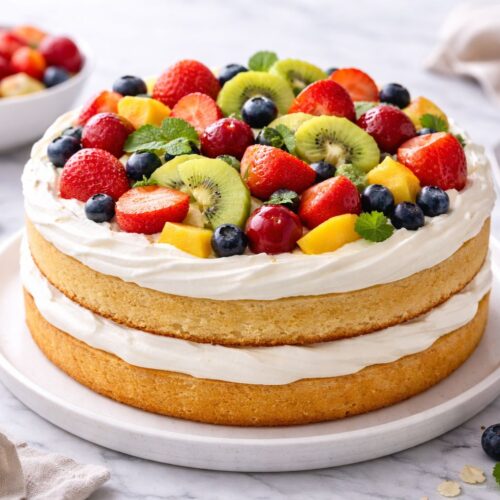
A fruit basket cake is a soft, tender cake layered or topped with fresh fruits, usually paired with light cream, whipped frosting, or a delicate glaze. It’s inspired by the idea of a fruit basket—abundant, colorful, and naturally beautiful.
This Fruit Basket Cake Recipe is:
- Light and fluffy
- Not overly sweet
- Packed with fresh fruit flavors
- Perfect for spring and summer
- Beautiful without being complicated
Instead of heavy buttercream, this cake lets fruit be the star. Every slice feels refreshing and indulgent at the same time.
Equipment List
You don’t need professional tools—just baking basics.
- 2 round cake pans (8-inch or 9-inch)
- Mixing bowls
- Hand mixer or whisk
- Measuring cups and spoons
- Rubber spatula
- Cooling rack
- Offset spatula (optional)
- Knife and cutting board (for fruit)
Ingredients
Cake Base
- 2½ cups all-purpose flour
- 2 teaspoons baking powder
- ½ teaspoon baking soda
- ¼ teaspoon salt
- ¾ cup unsalted butter, softened
- 1½ cups granulated sugar
- 3 large eggs, room temperature
- 1 tablespoon vanilla extract
- 1 cup milk or buttermilk
Whipped Cream Frosting
- 2 cups heavy whipping cream, cold
- ¼ cup powdered sugar
- 1 teaspoon vanilla extract
Fruit Topping (Use What’s Fresh)
- 1 cup strawberries, sliced
- 1 cup kiwi, peeled and sliced
- ½ cup blueberries
- ½ cup grapes or mandarin oranges
- 1 tablespoon lemon juice (to keep fruit fresh)
Instructions
Step 1: Prepare the Cake Pans
Preheat oven to 350°F (175°C). Grease and line cake pans with parchment paper.
Step 2: Mix Dry Ingredients
In a bowl, whisk flour, baking powder, baking soda, and salt. Set aside.
Step 3: Cream Butter and Sugar
In a large bowl, beat butter and sugar until light and fluffy. This step adds air and softness.
Step 4: Add Eggs and Vanilla
Beat in eggs one at a time, then mix in vanilla extract.
Step 5: Combine Wet and Dry
Add dry ingredients alternately with milk. Mix gently until just combined.
Step 6: Bake
Divide batter evenly between pans. Bake for 25–30 minutes, or until a toothpick comes out clean. Cool completely.
Step 7: Whip the Cream
Beat cold cream, powdered sugar, and vanilla until soft peaks form.
Step 8: Assemble the Cake
Place one cake layer on a plate. Spread whipped cream on top. Add second layer. Frost the top and sides lightly.
Step 9: Decorate with Fruit
Toss fruit with lemon juice. Arrange on top like a fruit basket—natural, colorful, and slightly overflowing.
What This Cake Tastes Like
This cake is:
- Soft and fluffy
- Lightly sweet
- Fresh and juicy from the fruit
- Creamy without feeling heavy
Each bite gives you tender cake, airy cream, and bursts of fruit. It feels like dessert—but not the kind that weighs you down.
Why I Love This Fruit Basket Cake Recipe
As a female chef, I’ve learned that some recipes are about balance. This cake balances sweetness, texture, and freshness beautifully.
I love that:
- It looks impressive but is easy
- It uses seasonal fruit
- It’s customizable
- Guests always ask for seconds
This Fruit Basket Cake Recipe never feels boring, no matter how many times I bake it.
Choosing the Best Fruits
Freshness matters more than perfection.
Best Fruits to Use
- Strawberries
- Blueberries
- Kiwi
- Mango
- Peaches
- Grapes
Avoid
- Overripe fruit
- Fruits that release too much juice
- Very acidic fruits in large amounts
Keep it colorful and balanced.
Decorating Tips (No Stress)
You don’t need perfection here.
- Start from the center and work outward
- Mix colors and shapes
- Let it look natural, not symmetrical
- Leave some cream peeking through
The charm is in the casual arrangement.
Variations You’ll Love
Sponge Cake Version
Use a lighter sponge for extra softness.
Chocolate Base
Add cocoa powder for a chocolate-fruit combo.
Custard Layer
Add vanilla custard between layers for richness.
Single-Layer Cake
Perfect for smaller gatherings.
This recipe adapts beautifully.
What to Serve With Fruit Basket Cake
- Hot tea or coffee
- Iced green tea
- Sparkling lemonade
- Fresh fruit salad
It’s a perfect brunch or afternoon cake.
Make-Ahead and Storage Tips
- Bake cake layers a day ahead
- Assemble just before serving
- Refrigerate leftovers up to 2 days
Fresh fruit is always best the same day.
Common Mistakes (And Easy Fixes)
Cake Too Dry?
Don’t overbake. Check early.
Cream Too Soft?
Chill bowl and beaters before whipping.
Fruit Sliding?
Pat fruit dry before placing.
Perfect Occasions for This Cake
- Birthdays
- Mother’s Day
- Spring brunch
- Baby showers
- Afternoon tea
- Summer parties
It fits anywhere you want something fresh and joyful.
Why This Cake Is Beginner-Friendly
If layer cakes scare you, start here.
- Soft forgiving cake
- No heavy frosting
- Simple decorating
- Flexible ingredients
It builds confidence with every bake.
A Little Personal Note
This cake reminds me why I fell in love with baking. It’s not about perfection—it’s about creating something beautiful and sharing it with people you care about.
This Fruit Basket Cake Recipe always brings smiles, and honestly, that’s the best ingredient of all.
Final Thoughts
If you’re looking for a cake that feels light, fresh, and celebratory, this one is it. It’s elegant without effort, sweet without excess, and colorful without trying too hard.
Bake it once, and it’ll become one of those recipes you come back to every year.
Fruit Basket Cake Recipe
Equipment
- 2 round cake pans (8-inch or 9-inch)
- Mixing bowls
- Hand mixer or whisk
- Measuring cups and spoons.
- Rubber spatula
- Cooling rack
- Offset spatula (optional)
- Knife and cutting board (for fruit)
Ingredients
Cake Base
- 2½ cups all-purpose flour
- 2 teaspoons baking powder
- ½ teaspoon baking soda
- ¼ teaspoon salt
- ¾ cup unsalted butter softened
- 1½ cups granulated sugar
- 3 large eggs room temperature
- 1 tablespoon vanilla extract
- 1 cup milk or buttermilk
Whipped Cream Frosting
- 2 cups heavy whipping cream cold
- ¼ cup powdered sugar
- 1 teaspoon vanilla extract
Fruit Topping (Use What’s Fresh)
- 1 cup strawberries sliced
- 1 cup kiwi peeled and sliced
- ½ cup blueberries
- ½ cup grapes or mandarin oranges
- 1 tablespoon lemon juice to keep fruit fresh
Instructions
Step 1: Prepare the Cake Pans
- Preheat oven to 350°F (175°C). Grease and line cake pans with parchment paper.
Step 2: Mix Dry Ingredients
- In a bowl, whisk flour, baking powder, baking soda, and salt. Set aside.
Step 3: Cream Butter and Sugar
- In a large bowl, beat butter and sugar until light and fluffy. This step adds air and softness.
Step 4: Add Eggs and Vanilla
- Beat in eggs one at a time, then mix in vanilla extract.
Step 5: Combine Wet and Dry
- Add dry ingredients alternately with milk. Mix gently until just combined.
Step 6: Bake
- Divide batter evenly between pans. Bake for 25–30 minutes, or until a toothpick comes out clean. Cool completely.
Step 7: Whip the Cream
- Beat cold cream, powdered sugar, and vanilla until soft peaks form.
Step 8: Assemble the Cake
- Place one cake layer on a plate. Spread whipped cream on top. Add second layer. Frost the top and sides lightly.
Step 9: Decorate with Fruit
- Toss fruit with lemon juice. Arrange on top like a fruit basket—natural, colorful, and slightly overflowing.

Hi, I’m Olivia Brooks! Cooking is my passion, and I love turning everyday ingredients into meals that bring joy to the table. On CulinaryPearl, I share simple recipes, helpful kitchen tips, and inspiration for food lovers everywhere