Intro
I still remember the first time I made this red velvet cheesecake recipe. It was one of those weekends where I wanted to bake something extra. Not just a cake. Not just cheesecake. I wanted drama. I wanted creamy. I wanted something that made people stop mid-bite and say, “Wait… what is THIS?”
That’s exactly what red velvet cheesecake does.
This dessert is bold but soft, rich but not heavy, and honestly a little magical. You get that classic red velvet cocoa flavor, the slight tang from buttermilk, and then boom — a thick, creamy cheesecake layer right in the middle. It’s the kind of dessert you make when you want to show love, celebrate something special, or just treat yourself because you absolutely deserve it.
I’ve tested this recipe more times than I can count, tweaked it, simplified it, and baked it for birthdays, holidays, and “just because” days. This version is reliable, decadent, and surprisingly doable, even if you’re not a professional baker.
Let’s talk about why this dessert is so special and how you can make it perfectly at home.
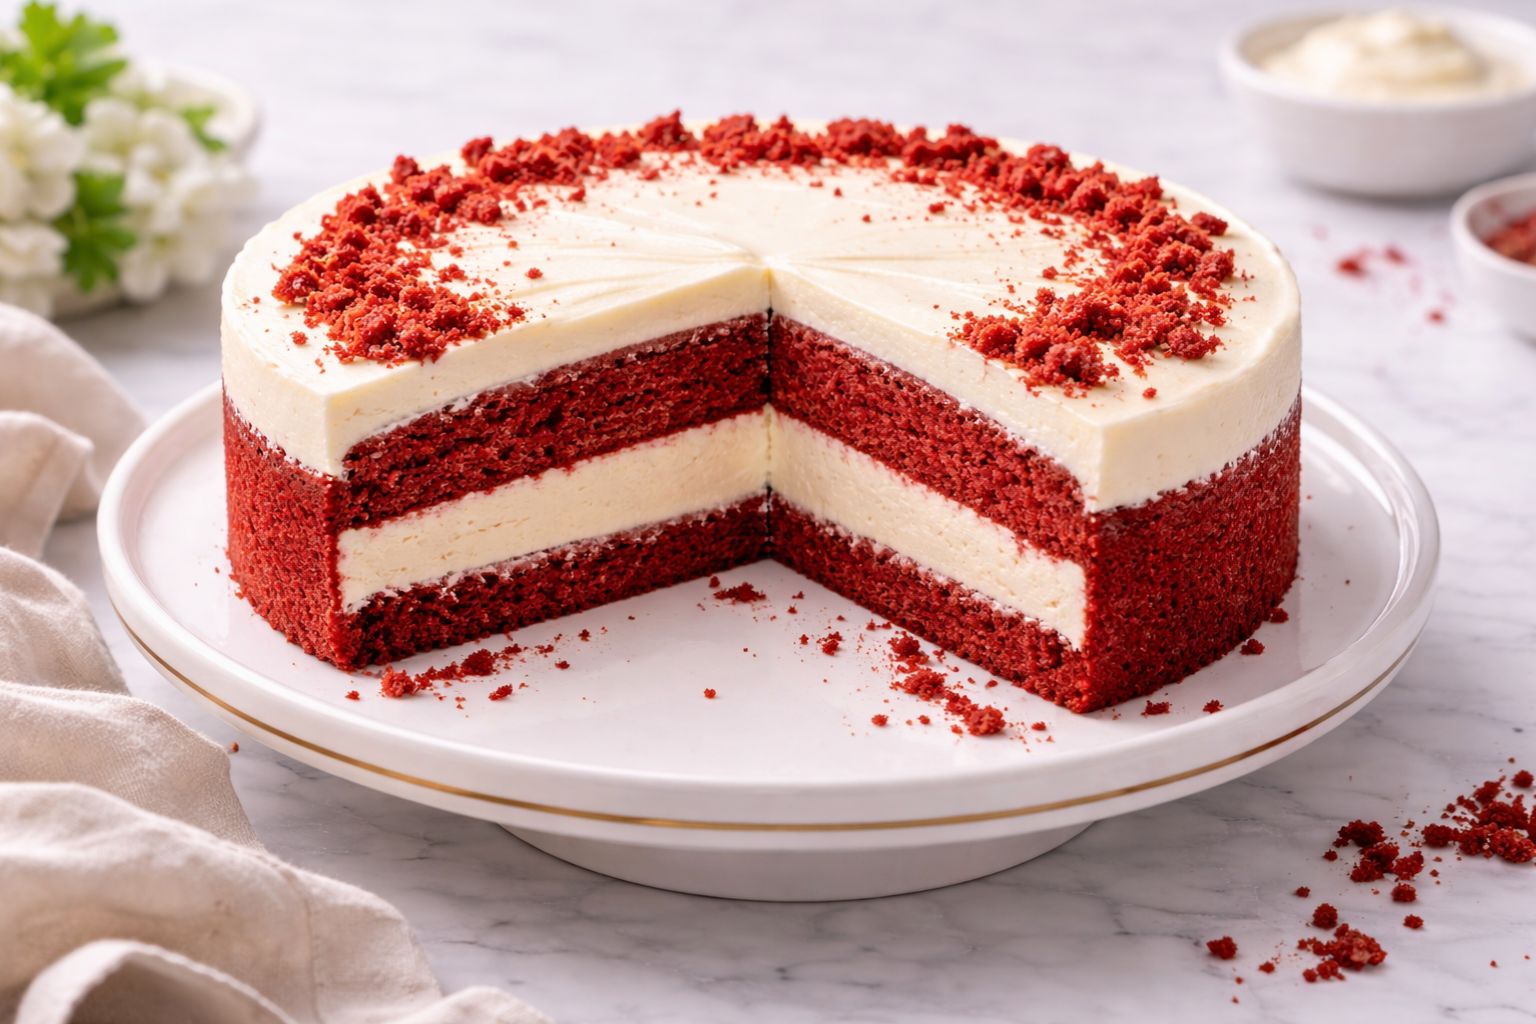
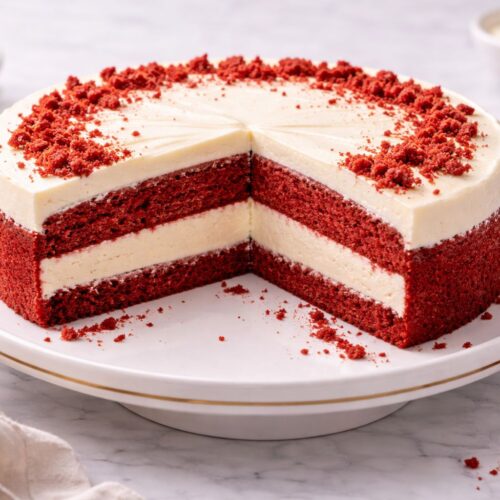
What Is Red Velvet Cheesecake?
Red velvet cheesecake is basically the love child of two iconic desserts: classic red velvet cake and creamy baked cheesecake.
Instead of choosing between cake or cheesecake, you get both. Typically, it has layers — moist red velvet cake on the bottom (and sometimes the top), with a thick cheesecake layer baked right in the center. The flavors balance each other beautifully. The cocoa in the cake keeps it from being too sweet, while the cheesecake brings richness and that smooth, tangy bite.
Some versions swirl cheesecake into red velvet batter, others stack layers. This recipe uses clean, defined layers, which I personally love because each bite gives you the full experience.
And let’s be honest — that deep red color with creamy white cheesecake? It’s a showstopper.
Why You’ll Love This Recipe
Let me tell you why this red velvet cheesecake recipe works so well:
- The cheesecake layer is ultra-smooth and creamy, not dry or crumbly
- The red velvet cake stays moist for days
- The flavors are balanced, not overly sweet
- It looks bakery-level but is totally homemade
- You don’t need fancy tools or rare ingredients
It’s indulgent, yes, but not overwhelming. And once you make it once, people will ask for it again. Trust me on that.
Equipment You’ll Need
Before we jump in, let’s get your kitchen ready. Nothing fancy here.
- 9-inch springform pan
- Mixing bowls (at least two)
- Hand mixer or stand mixer
- Rubber spatula
- Measuring cups and spoons
- Parchment paper
- Baking pan (for water bath)
- Aluminum foil
That’s it. If you can bake a cake, you can make this cheesecake.
Ingredients
For the Cheesecake Layer
- 16 oz (450 g) cream cheese, softened
- ½ cup granulated sugar
- 2 large eggs, room temperature
- 1 teaspoon vanilla extract
- ¼ cup sour cream
For the Red Velvet Cake
- 1 ½ cups all-purpose flour
- 1 cup granulated sugar
- 1 tablespoon unsweetened cocoa powder
- ½ teaspoon baking soda
- ½ teaspoon salt
- 1 cup buttermilk, room temperature
- ½ cup vegetable oil
- 1 large egg
- 1 tablespoon red food coloring
- 1 teaspoon vanilla extract
- 1 teaspoon white vinegar
Optional Cream Cheese Frosting
- 8 oz cream cheese, softened
- ¼ cup unsalted butter, softened
- 1 ½ cups powdered sugar
- 1 teaspoon vanilla extract
Instructions
Step 1: Make the Cheesecake Layer
In a mixing bowl, beat the cream cheese until smooth and creamy. Add sugar and mix until fluffy. Beat in the eggs one at a time, then add vanilla and sour cream. Mix just until combined.
Pour the cheesecake batter into a parchment-lined 9-inch springform pan. Bake at 325°F (165°C) for about 35–40 minutes, until set but slightly jiggly in the center. Let it cool completely, then chill in the fridge for at least 2 hours.
This step is worth it. A chilled cheesecake layer makes assembly so much easier.
Step 2: Prepare the Red Velvet Batter
In a bowl, whisk together flour, sugar, cocoa powder, baking soda, and salt.
In another bowl, mix buttermilk, oil, egg, food coloring, vanilla, and vinegar. Slowly combine the wet ingredients with the dry ingredients until smooth. Don’t overmix — red velvet cake loves a gentle hand.
Step 3: Assemble the Cake
Grease and line your springform pan. Pour half of the red velvet batter into the pan. Carefully place the chilled cheesecake layer on top. Pour the remaining red velvet batter over it, smoothing gently.
Wrap the pan in foil and place it in a larger baking dish. Fill the dish with hot water halfway up the sides to create a water bath. This keeps everything moist and crack-free.
Step 4: Bake
Bake at 350°F (175°C) for 55–65 minutes, until the top is set and a toothpick inserted into the cake layer comes out mostly clean.
Turn off the oven and crack the door slightly. Let the cake cool inside for 30 minutes, then remove and cool completely at room temperature. Chill for at least 4 hours, preferably overnight.
Patience here makes all the difference.
Cream Cheese Frosting (Optional but Amazing)
If you want to go all out, whip the cream cheese and butter until smooth. Add powdered sugar and vanilla. Spread lightly over the chilled cake or pipe decorative swirls on top.
This frosting adds another creamy layer without overpowering the cheesecake inside.
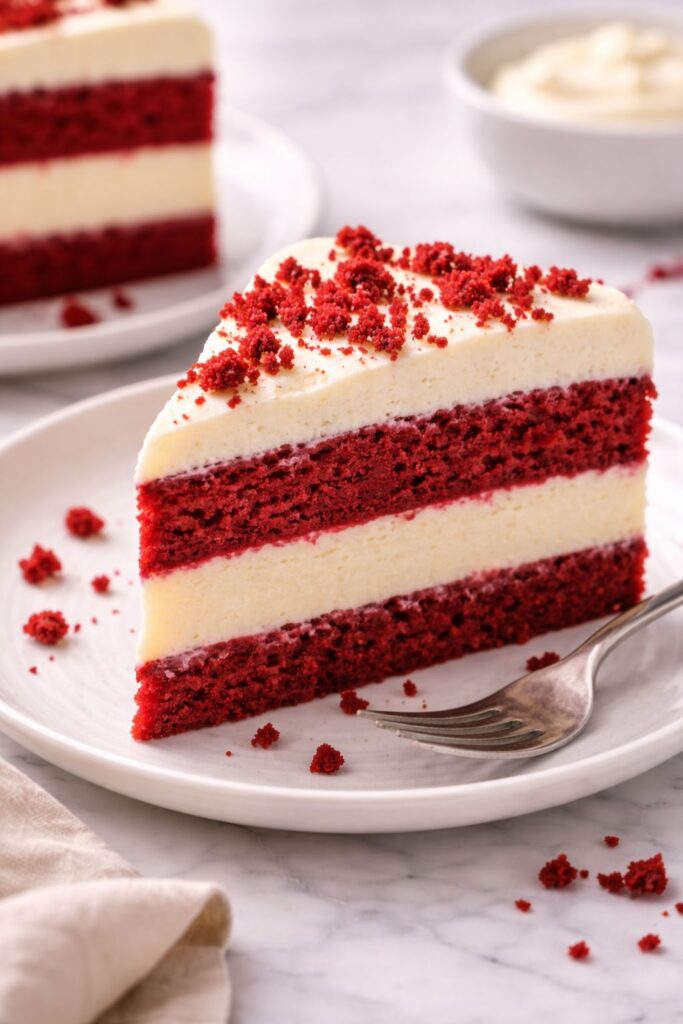
Flavor and Texture Breakdown
Let’s talk about what this actually tastes like.
The red velvet cake is soft, tender, and slightly cocoa-flavored, with that signature tang from buttermilk and vinegar. The cheesecake layer is dense but creamy, with a mild sweetness that balances the cake perfectly.
Together? It’s rich, smooth, and just indulgent enough to feel special without being too heavy.
Every forkful gives you contrast — fluffy cake, silky cheesecake, and that subtle chocolate note that makes red velvet so irresistible.
Tips for the Best Red Velvet Cheesecake
- Always use room-temperature ingredients
- Don’t skip the water bath
- Chill overnight for clean slices
- Use gel food coloring for a deeper red
- Wipe your knife between cuts for perfect slices
These small things make a big difference.
Storage and Make-Ahead Tips
This red velvet cheesecake recipe stores beautifully.
- Refrigerator: up to 5 days, covered
- Freezer: up to 2 months (wrap tightly)
You can make it a day ahead for events — it actually tastes better after chilling.
When to Serve This Dessert
This is not an everyday dessert. This is a moment dessert.
Perfect for:
- Holidays
- Valentine’s Day
- Birthdays
- Dinner parties
- Celebrations big or small
Or honestly… a random Tuesday when you want joy.
Final Thoughts From My Kitchen
This red velvet cheesecake recipe is one of those desserts that feels personal. It’s bold, beautiful, and comforting all at once. It takes a little time, but every step is worth it when you see those layers and take that first bite.
If you’ve ever been torn between cake and cheesecake, this is your answer.
Bake it slow. Chill it well. Share it with people you love — or keep a slice just for yourself. I won’t judge.
Red Velvet Cheesecake Recipe
Equipment
- 9-inch springform pan
- Mixing bowls (at least two)
- Hand mixer or stand mixer
- Rubber spatula
- Measuring cups and spoons.
- Parchment paper
- Baking pan (for water bath)
- Aluminum foil
Ingredients
For the Cheesecake Layer
- 16 oz 450 g cream cheese, softened
- ½ cup granulated sugar
- 2 large eggs room temperature
- 1 teaspoon vanilla extract
- ¼ cup sour cream
For the Red Velvet Cake
- 1 ½ cups all-purpose flour
- 1 cup granulated sugar
- 1 tablespoon unsweetened cocoa powder
- ½ teaspoon baking soda
- ½ teaspoon salt
- 1 cup buttermilk room temperature
- ½ cup vegetable oil
- 1 large egg
- 1 tablespoon red food coloring
- 1 teaspoon vanilla extract
- 1 teaspoon white vinegar
Optional Cream Cheese Frosting
- 8 oz cream cheese softened
- ¼ cup unsalted butter softened
- 1 ½ cups powdered sugar
- 1 teaspoon vanilla extract
Instructions
Step 1: Make the Cheesecake Layer
- In a mixing bowl, beat the cream cheese until smooth and creamy. Add sugar and mix until fluffy. Beat in the eggs one at a time, then add vanilla and sour cream. Mix just until combined.
- Pour the cheesecake batter into a parchment-lined 9-inch springform pan. Bake at 325°F (165°C) for about 35–40 minutes, until set but slightly jiggly in the center. Let it cool completely, then chill in the fridge for at least 2 hours.
- This step is worth it. A chilled cheesecake layer makes assembly so much easier.
Step 2: Prepare the Red Velvet Batter
- In a bowl, whisk together flour, sugar, cocoa powder, baking soda, and salt.
- In another bowl, mix buttermilk, oil, egg, food coloring, vanilla, and vinegar. Slowly combine the wet ingredients with the dry ingredients until smooth. Don’t overmix — red velvet cake loves a gentle hand.
Step 3: Assemble the Cake
- Grease and line your springform pan. Pour half of the red velvet batter into the pan. Carefully place the chilled cheesecake layer on top. Pour the remaining red velvet batter over it, smoothing gently.
- Wrap the pan in foil and place it in a larger baking dish. Fill the dish with hot water halfway up the sides to create a water bath. This keeps everything moist and crack-free.
Step 4: Bake
- Bake at 350°F (175°C) for 55–65 minutes, until the top is set and a toothpick inserted into the cake layer comes out mostly clean.
- Turn off the oven and crack the door slightly. Let the cake cool inside for 30 minutes, then remove and cool completely at room temperature. Chill for at least 4 hours, preferably overnight.
- Patience here makes all the difference.

Hi, I’m Olivia Brooks! Cooking is my passion, and I love turning everyday ingredients into meals that bring joy to the table. On CulinaryPearl, I share simple recipes, helpful kitchen tips, and inspiration for food lovers everywhere