
Intro
Halloween is so much fun. There are ghosts and goblins about. Candy fills every bowl. But don’t forget the kitchen! It is a wonderful method to party. You may prepare funky and yummy snacks. These are recipes that are ideal for your party. Young and old will have a good time with them. Get ready to bake!
This year, don’t buy what they sell in the store. Cooked desserts are far more delicious. They also look more festive. We have 15 Best Halloween Baking Recipes for you. Each one is simple to make. It is not necessary for you to be a top chef. We use words and steps that are easy. Your kitchen will have an autumn smell. Your guests will be quite glad.
So there are cookies and cakes. There are some adorable pumpkins. Others look truly scary. Here you will find something to suit you. Take your flour and sugar at this time. Take your finest spectral sprinkles. It is time to begin baking. Get the Halloween magic going!
The following are the most appropriate Halloween baking ideas.
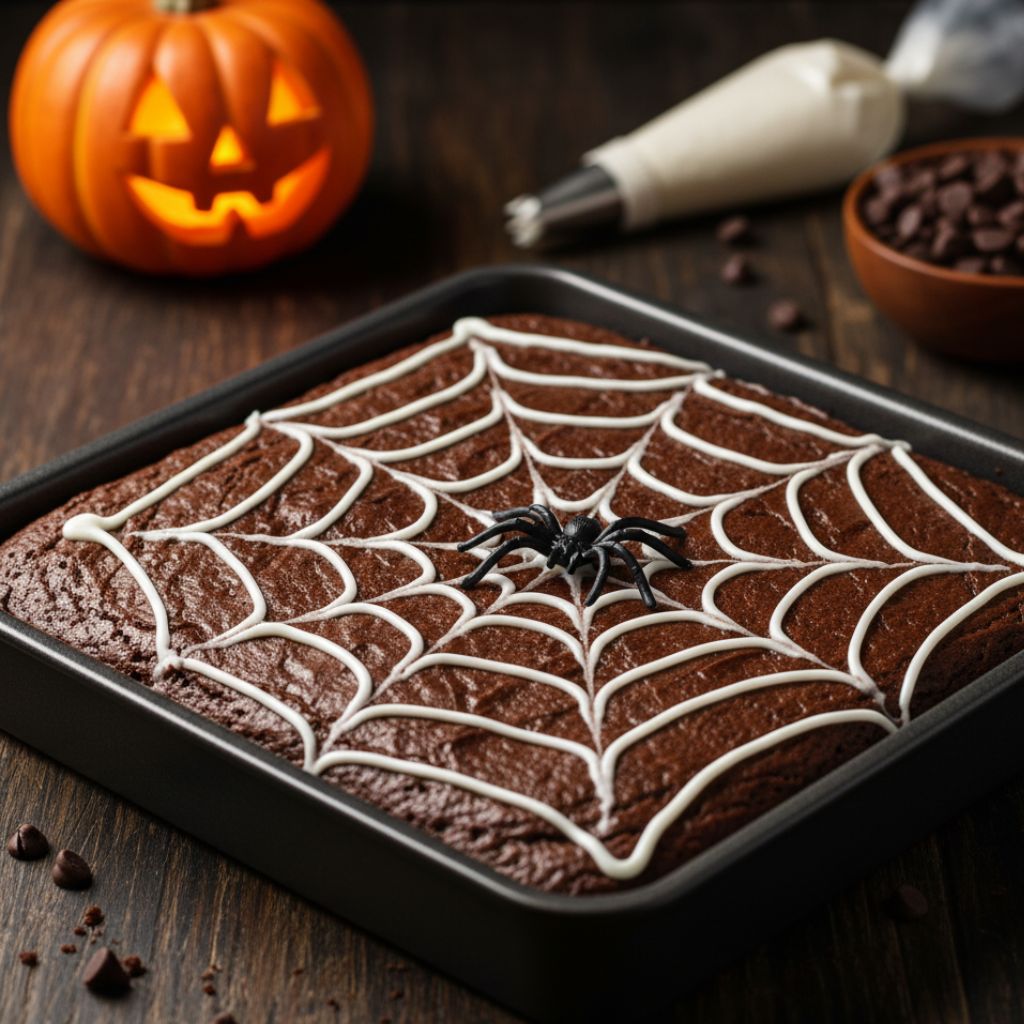
1. Spooky Spiderweb Brownies
Brownies are never a bad thing. They are rich and very fudgy. They are spooky with a spiderweb added to them. This is an easy trick to learn. All that is needed are two supplements. These brownies will appear fancy. They will all assume that you are a hard worker.
Bake your brownie mix of choice. Allow the entire pan to cool down. Next will be the web design. Use white icing for the lines. The shape of the web is made with a toothpick. It is a quick and fun design. These ghastly nets are so savory.
Ingredients:
Brownie mix = 1 box
Egg = 1
Vegetable oil = 1/4 cup
Water = 1 tablespoon
White vanilla icing = 1/2 cup
Instructions:
- Bake brownies as the box says.
- Let the pan cool all the way.
- Warm the white icing in slight amounts.
- Put icing in a small bag.
- Cut a tiny hole in the bag.
- Circle three on the brownie.
- Start with the center circle.
- Pull a toothpick at the center.
- Continue doing so until the pan is completely covered.
- Prepare and serve the spooky foods.
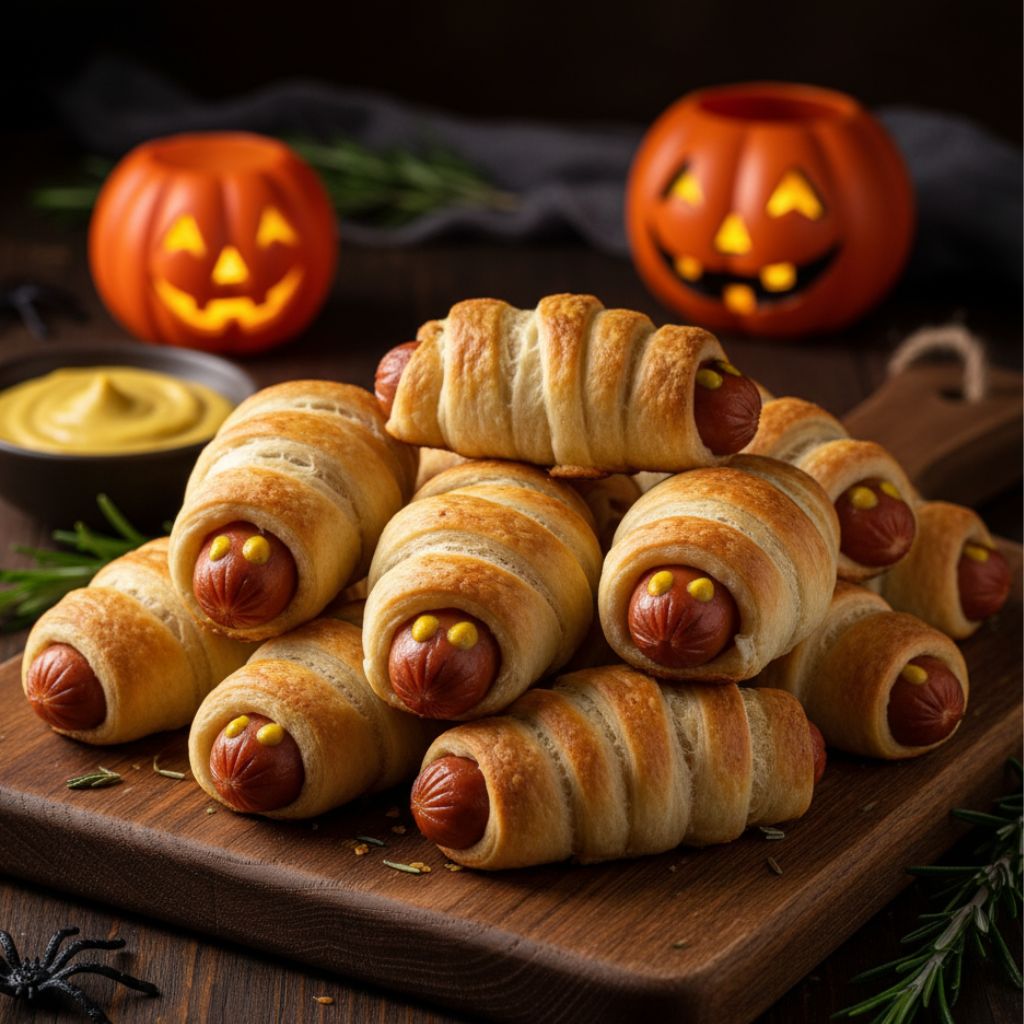
2. Mummy Dogs in Blankets
This is a fun, savory treat. It is not quite a sweet dessert. But it is perfect for a party. These mummy dogs look so cute. Their assembly is easy. Children are able to assist in making these.
You use hot dogs for the body. Wraps are made out of a crescent roll dough. Roll the dough into thin pieces. Cover the hot dogs with wrap strips. Leave a small gap for the face. Bake until the dough becomes golden. Mustard two dots to the eyes.
Ingredients:
Hot dogs = 8
Crescent roll dough = 1 can
Mustard = Small amount
Instructions:
- Preheat the oven to 375°F.
- Open the can of rolled dough.
- Roll and divide the dough.
- Following the triangles, cut into thin strips.
- Coil wrap strips on each hot dog.
- Leave space for the face area.
- Bake for 12 to 15 minutes.
- The dough must appear golden brown.
- Remove them and allow them to cool.
- With the mustard, draw two eyes.
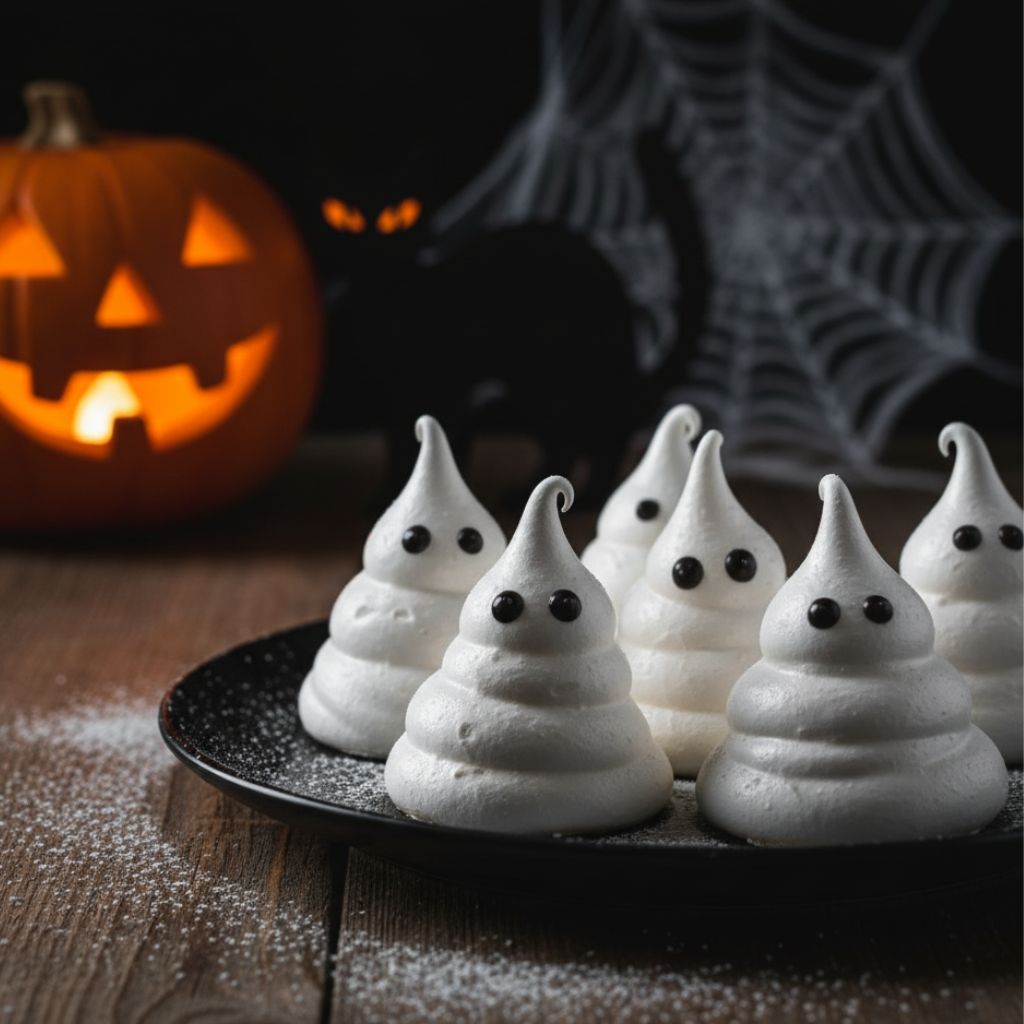
3. Ghostly Meringue Cookies
Meringue is a light and airy cookie. Once they melt inside your mouth. They are essentially prepared using egg whites. It is simple to mould them into ghosts. On a plate, they make a lovely appearance. They are so spooky and delicate.
It is necessary to whip the egg whites. They are to be highly inflexible and lustrous. Use a piping bag for the shape. Tall, ghostly shapes of pipes. Add two little eyes of black icing. Bake them slowly and at low heat. This renders them absolutely crisp.
Ingredients:
Egg whites = 2 large
Granulated sugar = 1/2 cup
Vanilla extract = 1/2 teaspoon
Black icing = Small tube
Instructions:
- Preheat the oven to 200°F.
- Prepare a baking sheet with paper.
- Whisk egg whites until they become foamy.
- Add sugar slowly in one spoonful increments.
- Beat until it is stiffer and shinier like peaks.
- Mix in the vanilla gently.
- Now, pour the contents into a piping bag.
- Pipe tall, wavy ghost shapes.
- Bake for 90 minutes until firm.
- Write eyes on them with black icing.
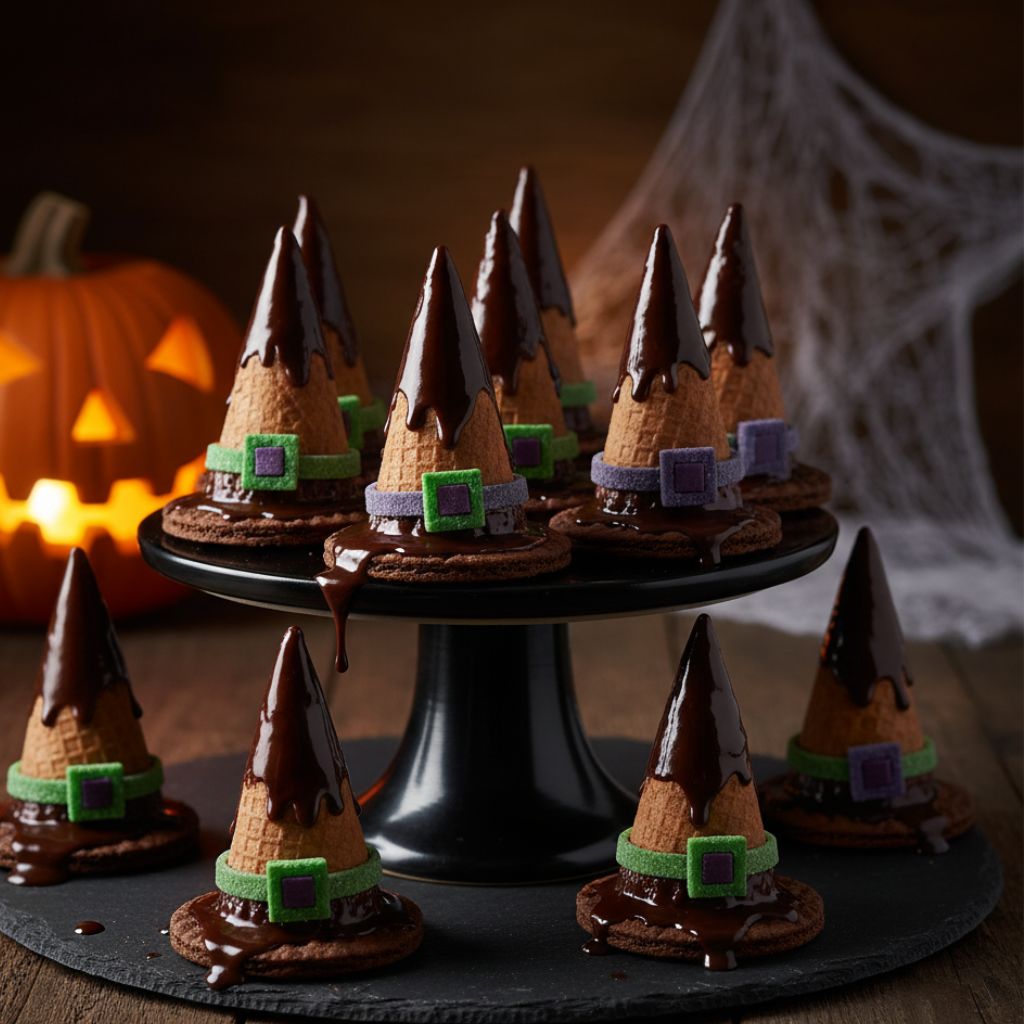
4. Wicked Witch Hat Cookies
These cookies are so much fun. They resemble the hat of a witch. Two plain cookie shapes are required. Commercial cookies are very effective. The entire treat is not very time-consuming. They can be prepared with children with ease.
A chocolate wafer is used as the rim. Top with a small ice cream cone. Dip the cone in the melted chocolate. Put it on the wafer cookie itself. Add a colored candy buckle. Green or purple candy is best. Allow the entire chocolate to cool.
Ingredients:
Chocolate wafer cookies = 12
Sugar ice cream cones = 12 small
Chocolate chips = 1 cup
Green or purple candies = 12 tiny.
Instructions:
- Slowly melt the chocolate chips.
- Add the melted chocolate to a bowl.
- Dip the top edge of each cone.
- Put the dipped cone on a wafer.
- It must resemble a little hat.
- Press one candy onto the cone.
- This candy is the hat’s buckle.
- Allow them to dry into a hard state.
- The chocolate should be allowed to dry.
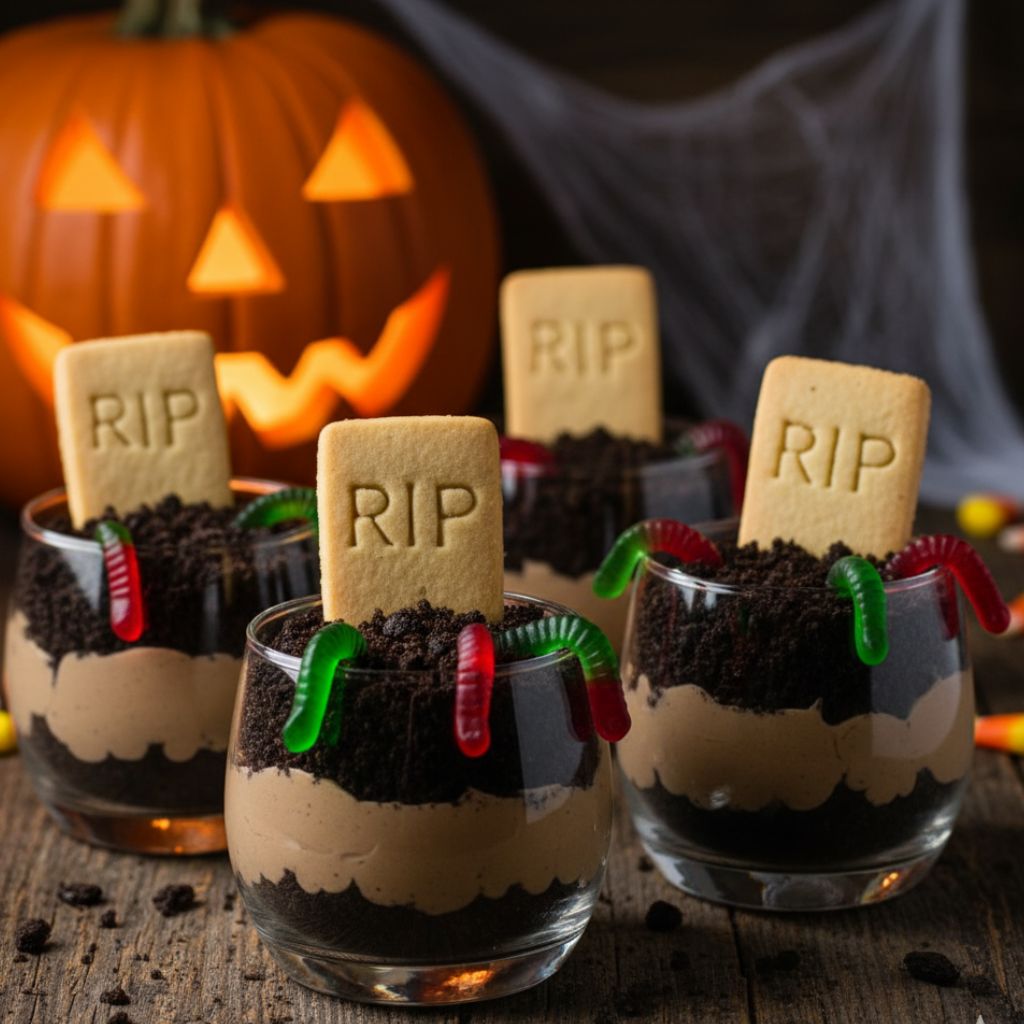
5. Graveyard Dirt Cups
These are plain no-bake desserts. They resemble small cemeteries. They consist of pudding and crumbs. They are presented in transparent glasses. All people are fond of this delicious dessert. It is very easy to prepare.
Break the chocolate sandwich cookies. These crumbs are the “dirt.” Add the crumbs and chocolate pudding. Add a gummy worm to add some scariness. Plant a tombstone of cookie in the soil. You can write RIP on the cookie RIP.
Ingredients:
Chocolate pudding = 3 cups
Chocolate sandwich cookies = 20
Gummy worms = 10
Small rectangular cookies = 10
Instructions:
- Blend cookies into fine crumbs.
- Use a food processor, should you have one.
- Put a layer of crumbs in cups.
- Spread some chocolate pudding.
- Repeat the pudding and crumb layers.
- Half fill up the cup with crumbs.
- Take a gummy worm and push it into the dirt.
- Sacrificing a cookie on its side.
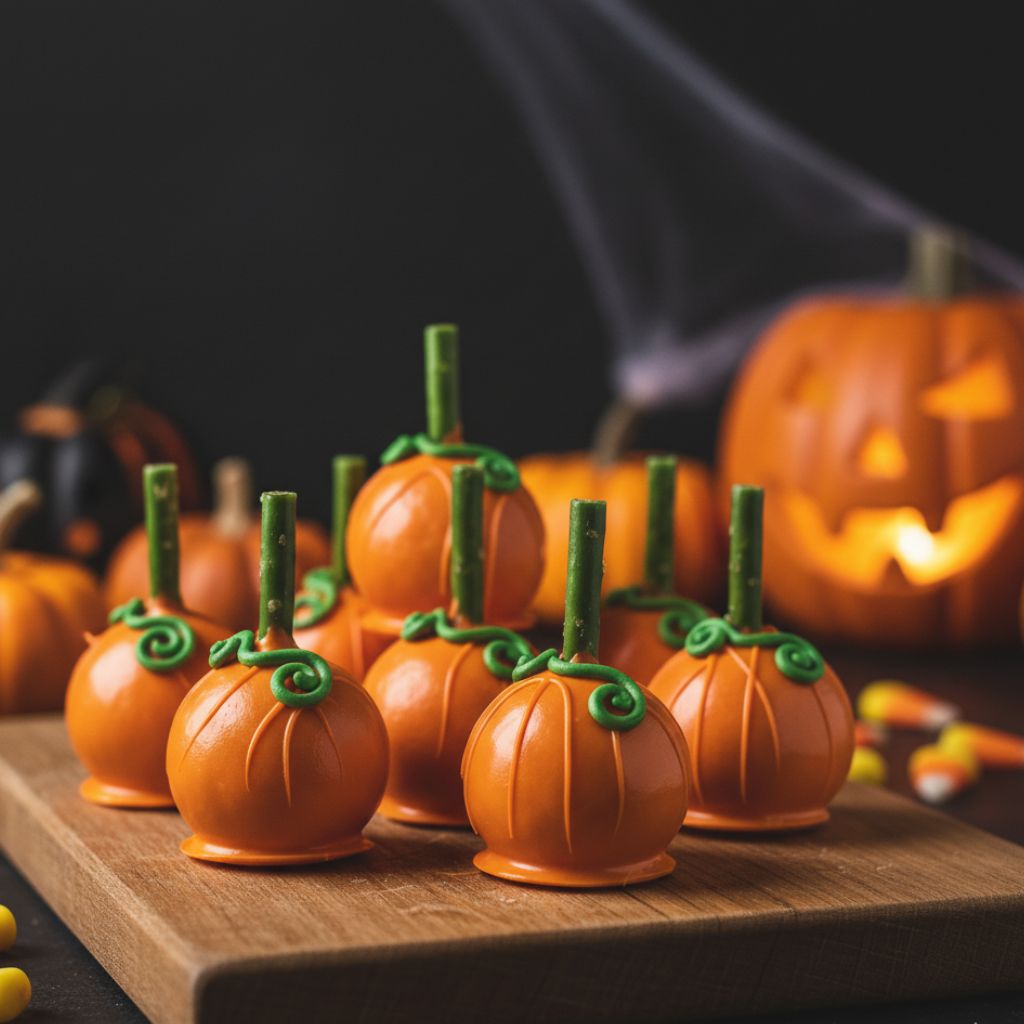
6. Pumpkin Patch Cake Pops
Cake pops are delightful snacks. They are a bit of work to make. But they have become so impressive now. It will be like pumpkins we will mould. Your party is ideal with them. Children are fond of food on a stick.
Make a cake and destroy it. Mix it with sweet frosting. Roll the mix into small balls. Chill these balls very well. Dip them in orange candy melts. Add a little green candy stem. The stem is used with a pretzel stick.
Ingredients:
Any baked cake = 1 whole
Vanilla frosting = 1/2 cup
Orange candy melts = 1 bag
Pretzel sticks = 15 small
Lollipop sticks = 15
Instructions:
- Bake a cake and let it cool.
- Finely crumble the entire cake.
- Combine vanilla frosting and mix crumbs.
- Form the mixture into balls that are small and round.
- Put the balls into the fridge to cool.
- Melt the orange candy melts.
- Wet the lollipop sticks in the melted.
- Insert a stick in every cake ball.
- Dip the entire ball of cake in orange.
- Insert a stick of pretzels in the top.
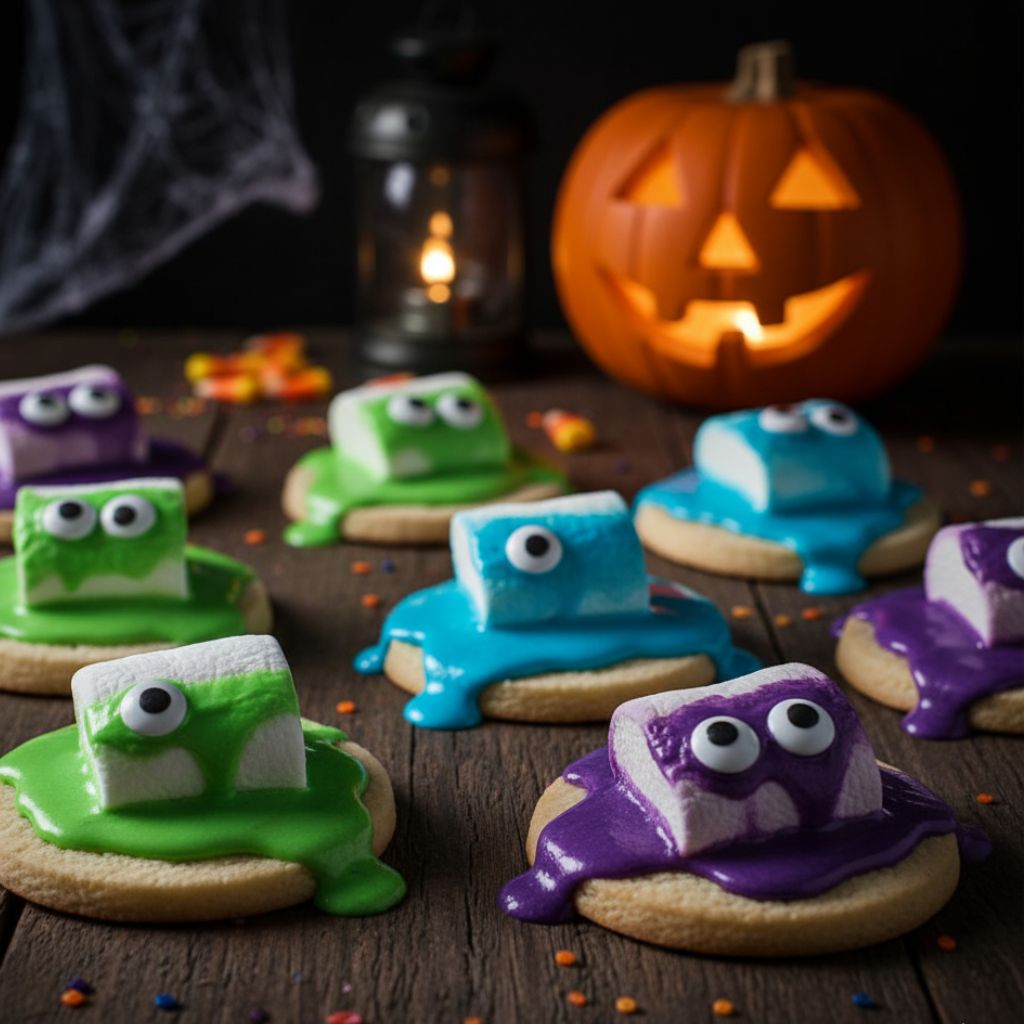
7. Melting Monster Cookies
These cookies are comical and amusing. It appears as though they are melting away. The base is made of sugar cookie dough. You can use a ready-made dough. This makes baking very fast. They are all colorful and so good.
Bake the cookies until it is cooked. All that they should do is to allow them to cool a little. Place a large marshmallow. Allow the marshmallow to liquefy. Enhance the melted marshmallow. Add a candy eyeball or two. The best appearance is with different colors.
Ingredients:
Sugar cookie dough = 1 package
Large marshmallows = 12
Food coloring = Various drops
Candy eyeballs = 24
Instructions:
- Cook the sugar cookies until they are cooked.
- Take them out of the oven.
- Place a piece of marshmallow on a cookie.
- Return them to the oven and cook for 1 minute.
- Peel them and put the meat on.
- Now mix the icing with various colors.
- Decorate the cookies with the colors.
- Top the candy eyeballs.
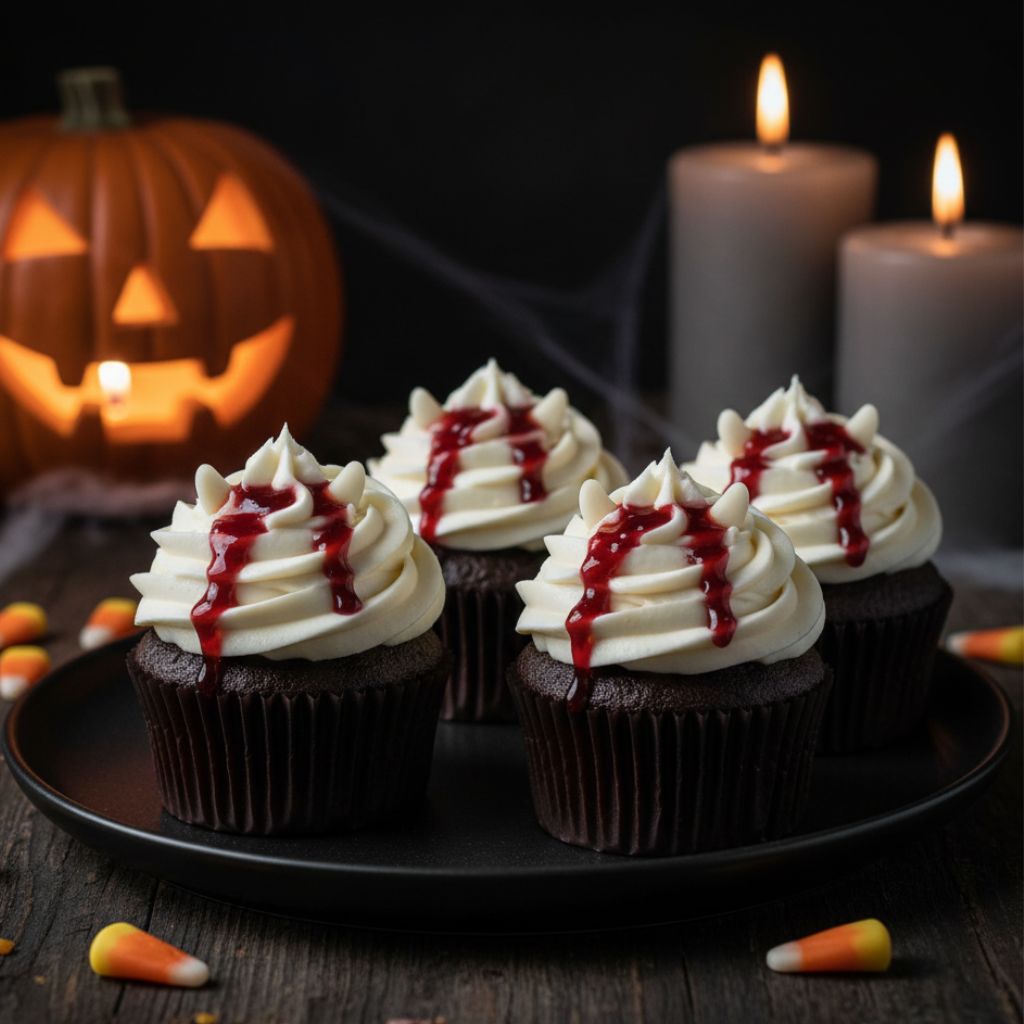
8. Vampire Bite Cupcakes
One of the foods used at a party is cupcakes. Make them appear even scarier in 2014. These vampire bite cakes are creepy. They are extremely simple to adorn. An amount of fake blood is frightening. This is very well done with red frosting.
Make your favorite red velvet cake. This resembles the appearance of the cake, which appears like blood. Frost and icing with white vanilla. This is the pale skin color. Make two little holes using a knife. Pipe red jam in these holes. It resembles a vampire bite mark.
Ingredients:
Red velvet cupcake mix = 1 box
White vanilla frosting = 1 tub
Raspberry jam = 1/4 cup
Instructions:
- Cook the cupcakes according to the box instructions.
- Let them cool completely now.
- Frost every one with white icing.
- Prepare two slits in the frosting.
- The cuts look like fang marks.
- Put the red jam in a piping bag.
- Rub jam in the incisions.
- The jam appears to be fresh blood.
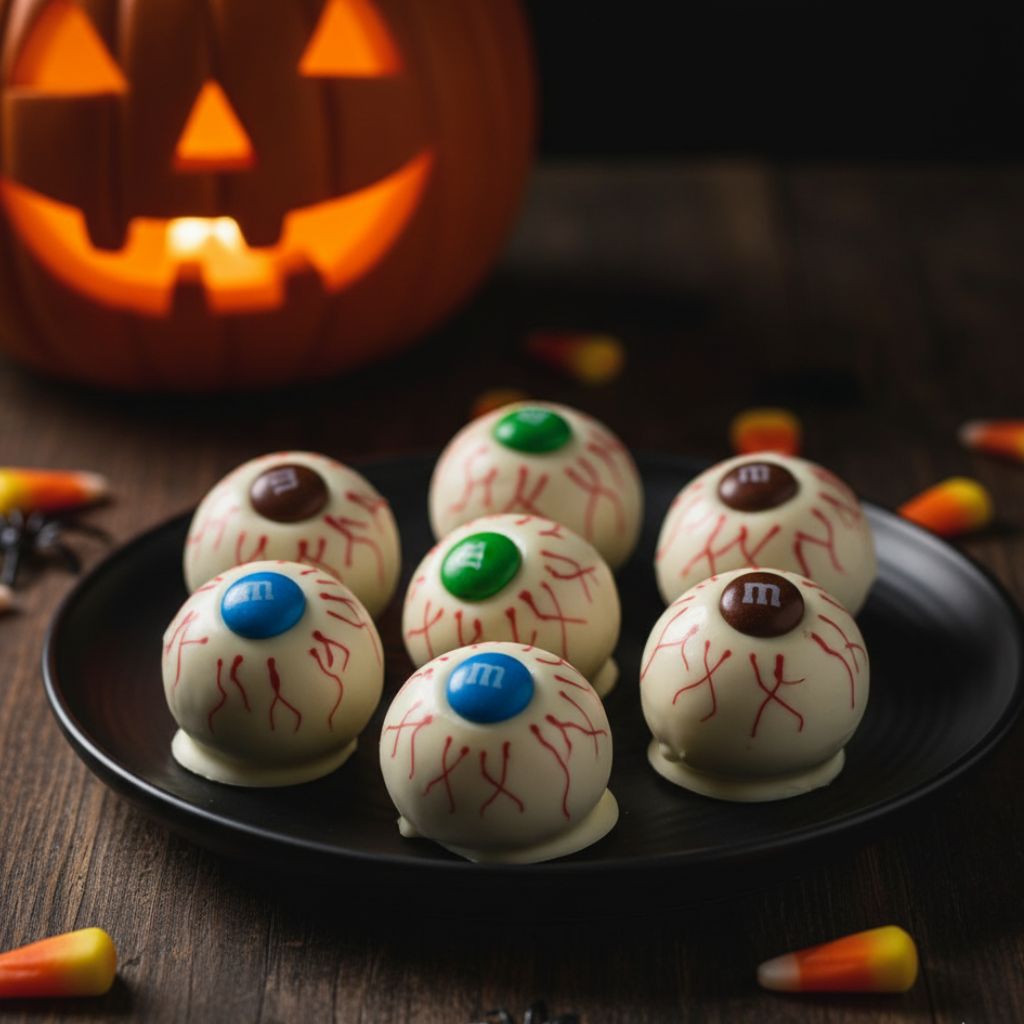
9. Peanut Butter Eyeball Treats.
These sweets are quite creepy. They resemble bubbles of frightening human eyes. They are prepared using peanut butter. They are uncooked and highly uncomplicated. Children will enjoy molding these balls. They are too salty and extremely sweet.
Blend peanut butter and sugar powder. Shake the mixture in little balls. Dip the balls in white chocolate at this point. A colored candy to the iris. veins Use red food marker. This move renders them believable.
Ingredients:
Peanut butter = 1 cup
Powdered sugar = 2 cups
White chocolate chips = 1 cup
M&M’s candies = 20
Red food coloring marker = 1
Instructions:
- Add sugar and peanut butter together.
- Roll the mixture into eyeballs.
- Chill the forms in the refrigerator.
- Melt chips of white chocolate.
- Dip the peanut butter balls at this point.
- Put them on a piece of baking paper to dry.
- Press one M&M into the center.
- Draw red veins using the marker.
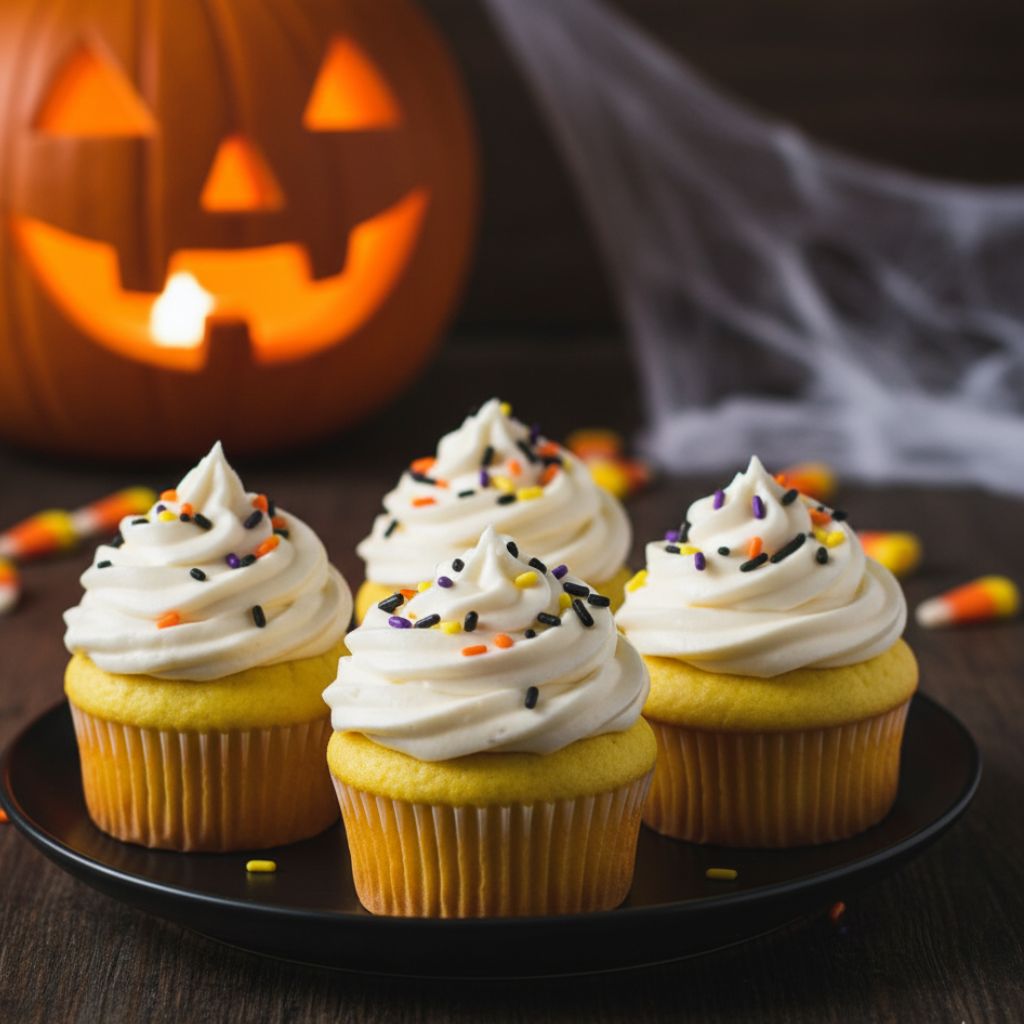
10. Candy Corn Cupcakes
Candy corn is a classic treat. These are highly festive colors. It can be made to look like cupcakes. This is a mere color gimmick. They are yellow, orange as well and white. They are even better than real candy corn.
Blend your ordinary white cake mix. Separate the batter into three. Color one part orange. Color one part yellow. Leave the last part white. The cupcake liner has layers of colors. Bake until cooked through.
Ingredients:
White cake mi = 1 box
Yellow food coloring = 1 or 2 drops
Red food coloring = Few drops
White frosting = 1 tub
Instructions:
- Blend cake batter according to the box.
- Separate the batter into three bowls.
- The first bowl is to be used in yellow.
- Combine yellow and red to get orange.
- Keep the third bowl plain white.
- Pour batter yellow into liners.
- Next, add the orange layer now.
- Batter layer with the white layer on top.
- Bake the colorful cupcakes.
- Frost with white icing on top.
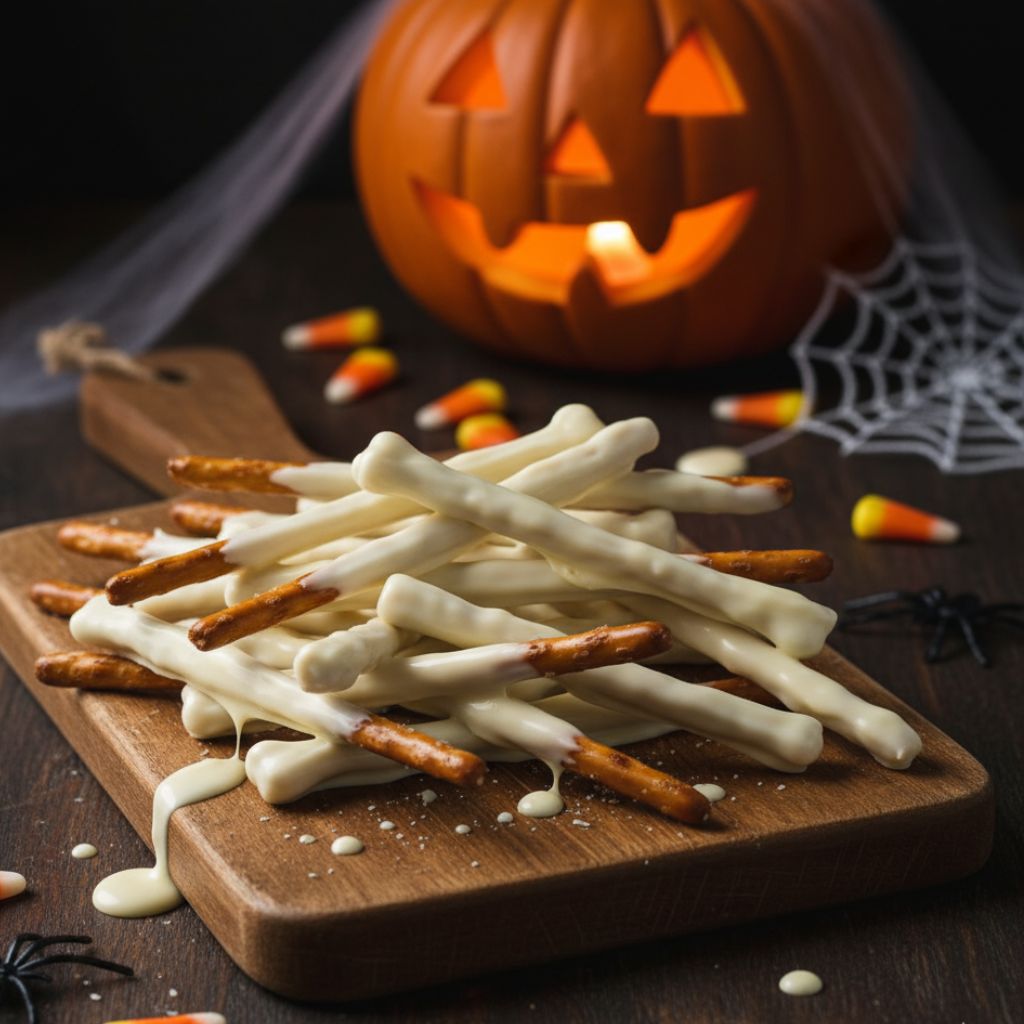
11. Pretzel Skeleton Bones
These snacks are salty and sweet. They resemble fearful white bones. They are extremely fast to assemble. And all you have to do is two things. Children adore the fact that they appear creepy. They make a terrific party table.
You need a few pretzel sticks for this. Stick dip in white chocolate. Spare a little to the “bone.” Allow the chocolate to dry well. You can make a large bone pile. It is a simple, effective idea.
Ingredients:
Pretzel rods or sticks = 20
White chocolate chips = 1 cup
Instructions:
- Melt the white chocolate chips at present.
- Add the melted chocolate to a bowl.
- Dip the pretzel sticks in it.
- Almost cover all the sticks with a coating.
- Pull it out and place it on paper.
- Allow the chocolate to become very hard.
- This will take about 30 minutes.
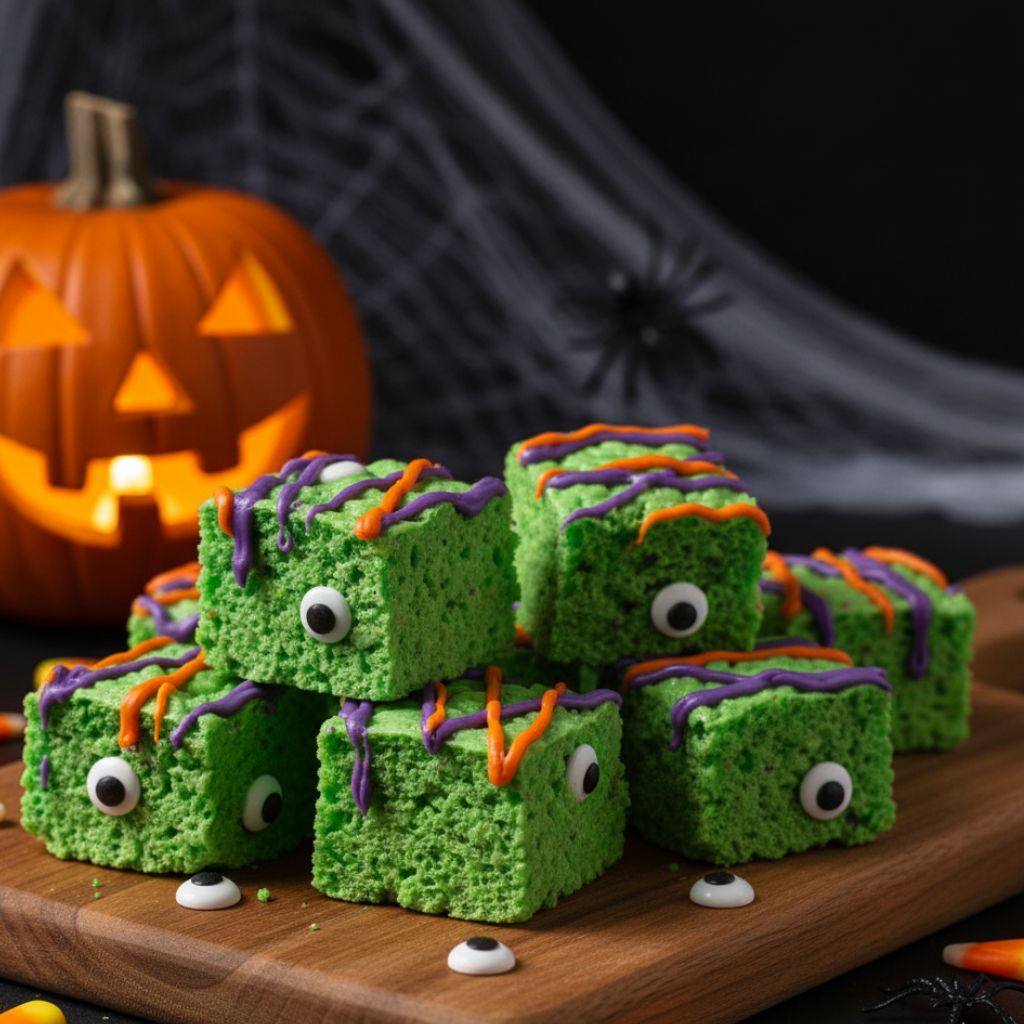
12. Monster Rice Krispie Treats
Krispy Rice treats are so simple. They are fun to make at any time. It is easy to transform them into monsters. It only takes fun colors and eyeballs. They are chewy and very sweet. It is an excellent snack amongst kids.
Prepare your simple Rice Krispies mixture. Set food coloring in the hot mixture. Best at the moment are green or purple in color. Cut the mixture into small squares. Apply much colored frosting. Add one or three candy eyeballs. The more eyes, the funnier they appear.
Ingredients:
Butter = 3 tablespoons
Marshmallows = 4 cups
Rice Krispies cereal = 6 cups
Food coloring = A few drops
Candy eyeballs = Many
Instructions:
- Melt the butter in a large pot.
- Add the marshmallows and melt.
- Now stir until the mixture is smooth.
- Add coloring to your food and combine it.
- Add the Rice Krispies cereal.
- Pour the mix into a prepared, greased pan.
- Allow them to cool and then cut up the squares.
- Paint a square each with one or more eyes.
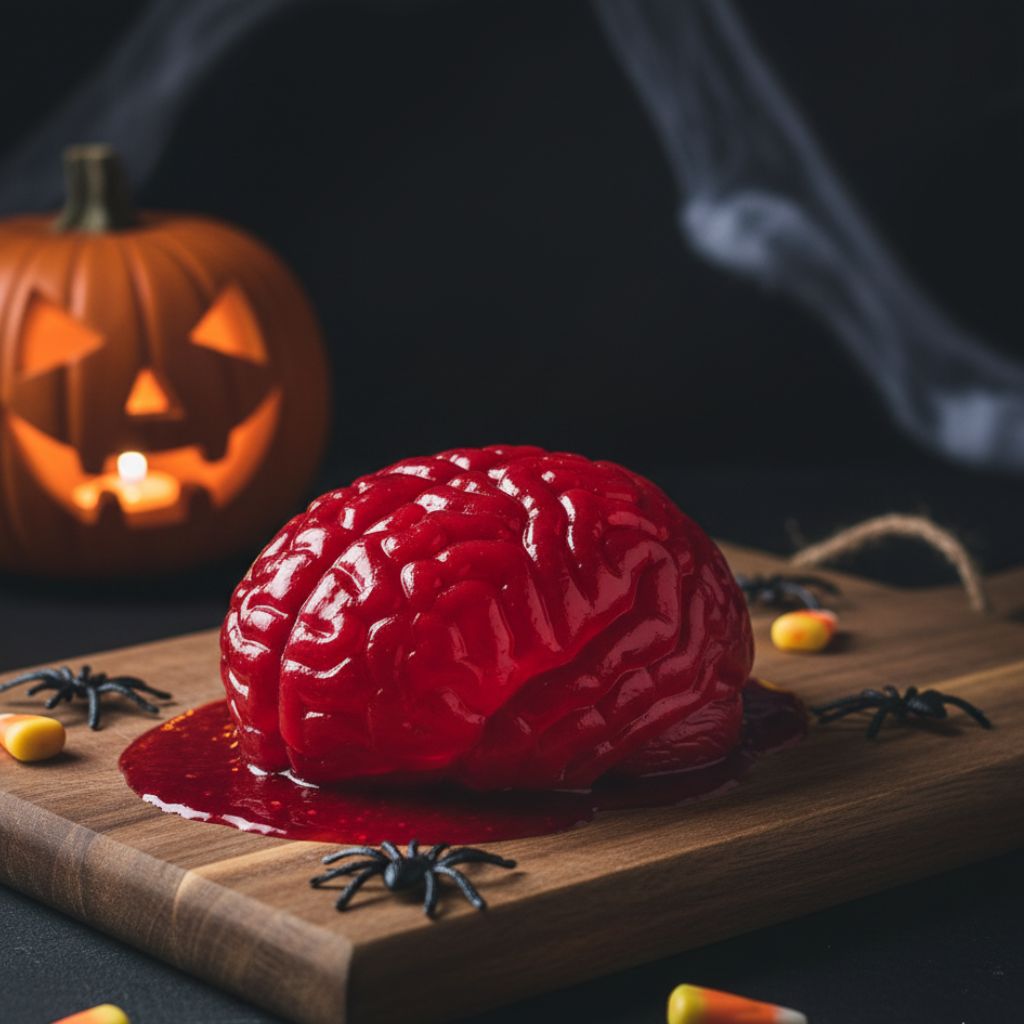
13. Brain Jello Mold
This one is indeed quite ugly-looking. It is ideal for a spooky party. Jello is inexpensive and simple to prepare. A special mold in the shape of the brain. The most real colors are red or pink. This will startle all your guests.
Combine your favorite flavor of Jell-O. Red is the best color to use. Pour the liquid in the brain mold. Now put it in the fridge to chill overnight. In order to serve, invert the mold. It is exactly similar to a real brain.
Ingredients:
Red Jello mix = 1 large box
Cold water = 2 cups
Boiling water = 2 cups
Brain shaped mold = 1
Instructions:
- Boil water in a large pot.
- Mix the Jello powder in a bowl.
- Add the mix to the boiling water.
- Stir prior to all of the powder being dissolved.
- Add the cold water, and stir.
- Ladle the Jello mixture into the brain mold.
- Take the mold and place it into the fridge.
- Chill it for at least 6 hours.
- Very carefully take it out of the mold.
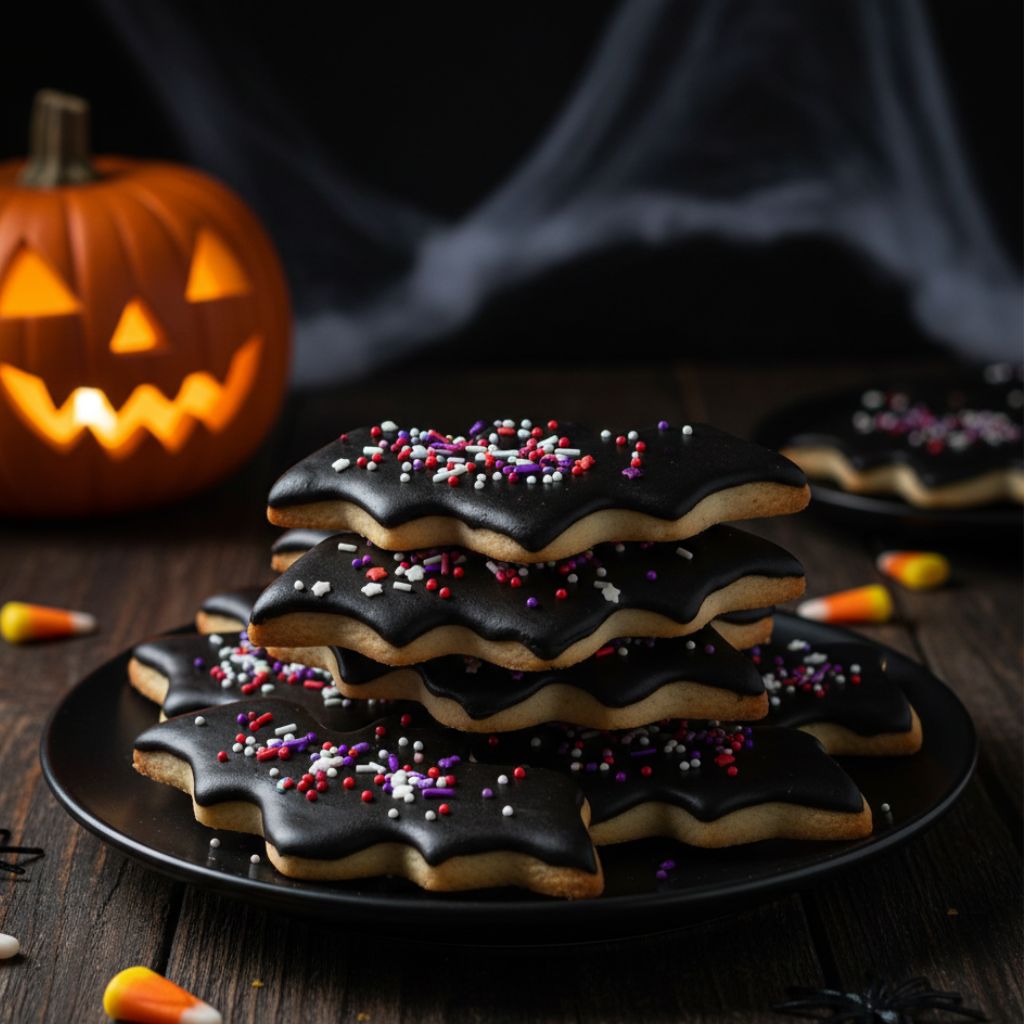
14. Sweet Bat Cookies
A classic is made of simple cutout cookies. A bat shape will be used at Halloween. They are very spooky with black icing. You may prepare the cookies in advance. This is time-saving on the day of the party. They are easy to grab and eat.
The recipe for your favorite sugar cookies. Spread out the dough very thin. Cut out many bat shapes now. Bake them until they are golden. Allow them to cool down completely. Decorate them with a heavy black icing. Add in a few sprinkles (red or white).
Ingredients:
Sugar cookie dough = 1 batch
Black food coloring = large quantities of drops.
Powdered sugar = 2 cups
Milk = 2 tablespoons
Instructions:
- Prepare your favorite cookie dough.
- Grate the dough on a surface.
- Use a cookie cutter now of a bat-shaped type.
- Bake the bat cookies until it is complete.
- Allow the baked cookies to cool.
- Combine the milk and the powdered sugar to ice.
- Add food coloring black to the mix.
- Stir until very deep black.
- Decorate the cookies with the black icing.
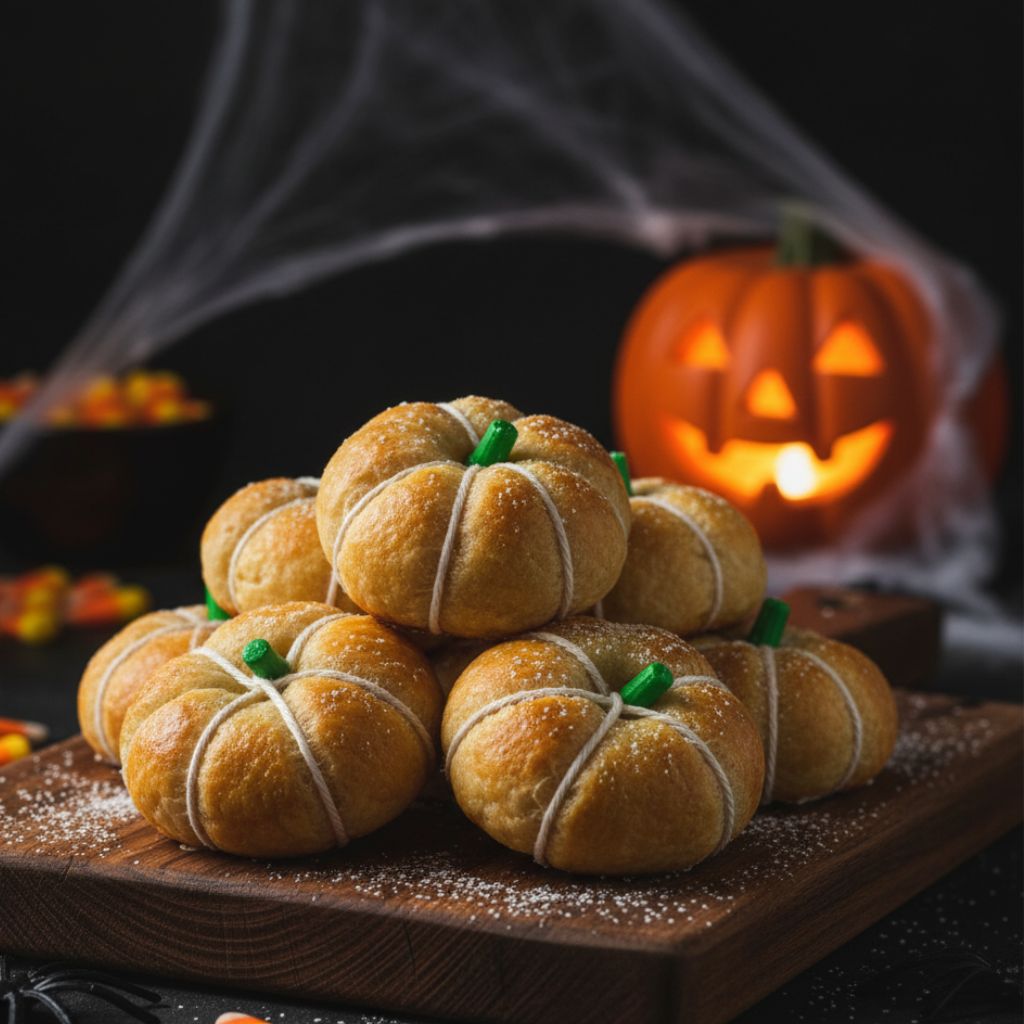
15. Crescent Roll Pumpkins
It is yet another savory snack. It is honey cinnamon limitless. These resemble miniature pumpkins. They take the crescent roll dough in cans. Nothing is needed but a few simple spices. They are hot and crunchy, and yummy.
Gently unroll the crescent dough. Sprinkle with cinnamon and sugar on it. Now cut the dough into thin strips. Roll the strips to form a ball. Wrap the ball in a string. It is the shape of the pumpkin made by this string. Take off the string upon baking.
Ingredients:
Crescent roll dough = 1 can
Cinnamon = 1 teaspoon
Sugar = 2 tablespoons
Green icing or candy = Scant amount.
Instructions:
- Preheat the oven to 375°F.
- Roll the crescent roll dough.
- Combine the sugar with cinnamon.
- Sprinkle the mixture on the dough.
- Now roll up the dough into a log.
- Cut the log into small circles.
- Tie a little string around, tenderly, on the side.
- The pumpkin shape is formed by the string.
- Bake until the pastry is golden.
- Eliminate the string upon baking.
- A little green stem added to the effect.
Conclusion
You now have many fun ideas. These 15 Best Halloween Baking Recipes are just what you need. They are easy to make at home. They will turn your party into a great party. Mysterious spiders, sweetest bats. You are now in need of nothing. Baking is a happy tradition.
Do not worry about perfection. Baking during Halloween is fun. Make a mess in the kitchen. Mock at the stupid monster faces. Spend time with your friends and family. Prepare to enjoy a nice evening. Merry baking and Merry Halloween!

Hi, I’m Olivia Brooks! Cooking is my passion, and I love turning everyday ingredients into meals that bring joy to the table. On CulinaryPearl, I share simple recipes, helpful kitchen tips, and inspiration for food lovers everywhere